Canonical recently announced the release of Ubuntu 24.04 LTS, codenamed “Noble Numbat”. This update underscores Ubuntu’s ongoing commitment to enhancing performance and security, focusing on optimizing developer productivity. The latest version features an optimized Linux kernel 6.8 and significant system management upgrades as detailed in the release notes. In this blog post, we highlight the key features and improvements that Ubuntu 24.04 LTS brings to the table, specifically tailored for users of Microsoft/Azure.
Unified marketplace offering
Ubuntu 24.04 LTS introduces a consolidated Azure Marketplace experience. Easily find the official Ubuntu images created by Canonical and endorsed by Microsoft for Azure, all under a single offering: ubuntu-24_04-lts. This simplification aids your search and selection process, helping you choose the right image for your needs and ensuring optimal compatibility and performance. [Explore the Ubuntu 24.04 images on the Azure Marketplace].
Optimized for Azure
Ubuntu 24.04 LTS is finely tuned to enhance performance on Azure infrastructure, ensuring that the Ubuntu images are fully compatible and support the latest cloud features as they are released. This optimization boosts system efficiency, speed, and reliability. Integration with Azure Guest Patching and the Update Management Center facilitates streamlined and continuous system updates, thereby reinforcing the overall security and stability of Ubuntu deployments.
Enhanced developer toolchains
.NET 8 is fully compatible with Ubuntu 24.04 LTS from launch, being directly available through the official Ubuntu feeds. This synchronization with the .NET release cadence ensures developers have immediate access to the latest features and updates. Additionally, .NET 8 introduces streamlined package management and new Ubuntu container images, boosting development flexibility and deployment efficiency. (Read more in this Microsoft’s blog post).
The commitment to developer productivity also extends to other popular programming languages, including TCK-certified Java versions and the latest Rust toolchains, enhancing support and smoothing the development experience.
Confidential Computing
Ubuntu continues to lead in confidential computing with support for Confidential VMs, including capabilities for confidential AI. This is facilitated by utilizing advanced hardware security extensions such as AMD’s 4th Gen EPYC processors with SEV-SNP and NVIDIA H100 Tensor Core GPUs. These features help safeguard data at runtime from system vulnerabilities and unauthorized access, making them particularly suitable for AI training and data inference involving sensitive information.
Windows Subsystem for Linux (WSL)
Ubuntu 24.04 LTS enhances its WSL integration using the same installer technology as Ubuntu Server. This update includes support for cloud-init, standardizing developer environments across installations and ensuring consistent and streamlined workflows.
Wrapping up
As we explore the capabilities of Ubuntu 24.04 LTS, Microsoft/Azure users will experience an integration that is tailored to current technological needs and equipped for upcoming developments. This version is supported for up to 12 years, providing a stable and reliable foundation that enterprises and developers can rely on for long-term projects and innovation.
Ubuntu 24.04 LTS was released just a few days ago and many Ubuntu users will now slowly plan their upgrades, whether it’s going to be over the next few days, weeks, months or years.
When it comes to running Incus on Ubuntu 24.04 LTS, there are a few options detailed below.
About Incus
Incus is a container and virtual machine manager which aims at providing a cloud-like experience but fully self-hosted and capable of running on just about anything, from a single board computer, to a laptop to a cluster of high end servers.
Incus was created following Canonical’s decision to make LXD a fully in-house project and it is actively maintained by the same team that once created LXD, almost 10 years ago. It’s part of the Linux Containers project and so benefits of all the infrastructure and experience in maintaining stable software over decades.
Native Incus packages
Incus 6.0 LTS is included directly in the Ubuntu Archive, making it very easy to install:
Simple container experience: apt install incus
Container and virtual-machines: apt install incus qemu-system-x86-64
To migrate from LXD: apt install incus-tools
Installing Incus that way is convenient as it doesn’t use external repositories nor does it rely on alternative packaging methods like snaps. That’s also the exact same set of Incus packages that will be shipped with Debian 13 (Trixie) in just a few more months.
On the support front, this is using Incus 6.0 LTS and so uses a version of Incus that will be supported upstream for the next 5 years. The package itself is in the universe repository and so doesn’t come with security updates provided by Canonical as part of stock Ubuntu.
However Canonical now provides additional security updates to Ubuntu Pro users which includes both security updates and support for all 23000 packages in universe.
Those packages are quite different from the ones shipped directly in Ubuntu or Debian as they also directly include the most critical dependencies so that the whole solution can be tested and validated as a single unit.
That makes it much easier for me to provide timely fixes as well as commercial support for users of those packages. It also allows for decoupling the Incus installation/version from the OS version, making major system updates easier.
Packages are available for Ubuntu 20.04, 22.04 and now 24.04 LTS as well as Debian 11 and Debian 12.
Moving from LXD
Ubuntu 24.04 LTS ships with LXD 5.21, migrating from LXD 5.21 to Incus 6.0 LTS can be done very easily by running the “lxd-to-incus” command.
It supports very quickly and reliably migrating data from LXD installations as old as LXD 4.0.0 all the way to and including LXD 5.21.
Running Ubuntu 24.04 LTS on top of Incus
If you’re just looking at using Ubuntu 24.04 LTS but don’t want to upgrade your whole system yet, or you’re running another Linux distribution and just want to experiment with Ubuntu 24.04 LTS, you can easily do that through Incus.
Incus has the following images ready for use:
Ubuntu 24.04 LTS base image
Our default Ubuntu 24.04 LTS image. It’s pretty lightweight while still containing most expected tools for day to day operation.
It’s available for both containers (125MiB compressed) and virtual-machines (270MiB compressed).
Ubuntu 24.04 LTS cloud image
Our cloud-init enabled Ubuntu 24.04 LTS image, it’s basically the same as the default image but with cloud-init enabled for automated provisioning.
It’s available for both containers (150MiB compressed) and virtual-machines (305MiB compressed).
Ubuntu 24.04 LTS desktop image
Our desktop (Gnome) Ubuntu 24.04 LTS image, it boots directly into a pre-created user account and makes it extremely easy to try the latest Ubuntu Desktop experience.
This image is only available as a virtual-machine (1.1GiB compressed).
Conclusion
Hopefully this provided a pretty good overview of how to get Incus up and running on Ubuntu 24.04 LTS, either by moving from an existing LXD installation over to Incus or installing it fresh.
If you’d just like to learn more about Incus without having to install it locally, our online demo service is as great for that as ever!
Kubernetes is very straightforward for deploying and managing stateless applications. Consequently, proper backups of the Kubernetes environment have often been postponed or neglected. Today, however, more and more applications running on Kubernetes are stateful, making backup and recovery solutions for these systems critical. Neglecting backup is risky: as applications become more complex and need to preserve their states, the challenges of recovering a setup increase. Therefore, platform engineers need a comprehensive backup solution for Kubernetes.
CloudCasa is a SaaS offering that provides data protection, recovery, and migration for Kubernetes. It provides a best-in-class solution for multi-cluster, multi-cloud and hybrid-cloud Kubernetes environments.
Caption: The CloudCasa dashboard, where it all comes together
The CloudCasa service comes in two variants: The CloudCasa Pro service provides centralised backup services for large, complex, multi-cluster, multi-cloud, and hybrid cloud environments. The recently introduced CloudCasa for Velero service brings similar enterprise features to existing installations of Velero, the popular open source Kubernetes backup solution. These features include centralised management and monitoring, alerts, job history, guided recovery, RBAC, and commercial support. Taking advantage of these leading-edge Kubernetes backup capabilities is now easier than ever, as Catalogic has released a CloudCasa charm.
Why use the CloudCasa charm?
The charm for CloudCasa is a Kubernetes operator created with the Charm SDK for Juju. Juju is an open source orchestration engine for software operators that enables the deployment, integration and lifecycle management of applications at any scale, on any infrastructure. An application can be a database, a web server, a dashboard or, in this case, backup software.
As a SaaS offering, an important part of CloudCasa’s value proposition is easy set-up and configuration, and minimal time to first backup. The only software component that customers need to install is the CloudCasa agent, so the engineering team is always looking for ways to make installation and upgrade of the agent easier for customers. They also wanted a native integration for Canonical’s Kubernetes platform. Juju was the perfect fit, and the charm makes consuming CloudCasa seamless for users.
“We’re excited that, working with our partners at Canonical, we were able to quickly implement the CloudCasa charm, providing convenient installation and management of our agent and consistent operations for customers using the Juju framework,” said Bob Adair, Head of Product Management at CloudCasa. ”As Kubernetes becomes more prevalent in the enterprise and the applications running on it become stateful and more complex, DevOps, SRE, and platform engineering teams need to think seriously about adequately protecting and managing these critical environments. This is where both CloudCasa and charms come in.”
How to install CloudCasa using the Charm
The CloudCasa charm can be installed directly from Charmhub using just a few simple Juju commands. The charm is available on charmhub.io. To get started with an existing cluster and an installation of Juju execute:
$ juju deploy cloudcasa
Then as the bare minimum of configurations, you set the cluster id:
$ juju config cloudcasa clusterid=<clusterid>
The CloudCasa application provides a way to trigger the installation of the charm. Users can access the Add and Edit Cluster wizards in the CloudCasa UI directly.
Caption: Select the charm when configuring a K8s cluster in the Add Cluster wizard
About CloudCasa by Catalogic
CloudCasa by Catalogic is a Kubernetes backup-as-a-service providing innovative multi-cloud data protection, migration, and disaster recovery for Kubernetes applications and cloud data services. CloudCasa enables multi-cluster and multi-cloud application resiliency and mobility with granular or cluster-level recovery, across accounts, regions and even across clouds. CloudCasa is fully compatible and complementary to Velero, the open-source Kubernetes backup tool that has been downloaded over 100 million times. Signup for CloudCasa for Velero.
A few weeks ago, in episode 25 of Linux Matters Podcast I brought up the subject of ‘Coding Joy’. This blog post is an expanded follow-up to that segment. Go and listen to that episode - or not - it’s all covered here.
Not a Developer
I’ve said this many times - I’ve never considered myself a ‘Developer’. It’s not so much imposter syndrome, but plain facts. I didn’t attend university to study software engineering, and have never held a job with ‘Engineer’ or Developer’ in the title.
(I do have Engineering Manager and Developer Advocate roles in my past, but in popey’s weird set of rules, those don’t count.)
I have written code over the years. Starting with BASIC on the Sinclair ZX81 and Sinclair Spectrum, I wrote stuff for fun and no financial gain. I also coded in Z80 & 6502 assembler, taught myself Pascal on my Epson 8086 PC in 1990, then QuickBasic and years later, BlitzBasic, Lua (via LÖVE) and more.
In the workplace, I wrote some alarmingly complex utilities in Windows batch scripts and later Bash shell scripts on Linux. In a past career, I would write ABAP in SAP - which turned into an internal product mildly amusingly called “Alan’s Tool”.
These were pretty much all coding for fun, though. Nobody specced up a project and assigned me as a developer on it. I just picked up the tools and started making something, whether that was a sprite routine in Z80 assembler, an educational CPU simulator in Pascal, or a spreadsheet uploader for SAP BiW.
In 2003, three years before Twitter launched in 2006, I made a service called ‘Clunky.net’. It was a bunch of PHP and Perl smashed together and published online with little regard for longevity or security. Users could sign up and send ’tweet’ style messages from their phone via SMS, which would be presented in a reverse-chronological timeline. It didn’t last, but I had fun making it while it did.
They were all fun side-quests.
None of this makes me a developer.
Volatile Memories
It’s rapidly approaching fifty years since I first wrote any code on my first computer. Back then, you’d typically write code and then either save it on tape (if you were patient) or disk (if you were loaded). Maybe you’d write it down - either before or after you typed it in - or perhaps you’d turn the computer off and lose it all.
When I studied for a BTEC National Diploma in Computer Studies at college, one of our classes was on the IBM PC with two floppy disc drives. The lecturer kept hold of all the floppies because we couldn’t be trusted not to lose, damage or forget them. Sometimes the lecturer was held up at the start of class, so we’d be sat twiddling our thumbs for a bit.
In those days, when you booted the PC with no floppy inserted, it would go directly into BASICA, like the 8-bit microcomputers before it. I would frequently start writing something, anything, to pass the time.
With no floppy disks on hand, the code - beautiful as it was - would be lost. The lecturer often reset the room when they entered, hitting a big red ‘Stop’ button, which instantly powered down all the computers, losing whatever ‘work’ you’d done.
I was probably a little irritated at the moment, just as I would when the RAM pack wobbled on my ZX81, losing everything. You move on, though, and make something else, or get on with your college work, and soon forget about it.
Or you bitterly remember it and write a blog post four decades later. Each to their own.
Sharing is Caring
This part was the main focus of the conversation when we talked about this on the show.
In the modern age, over the last ten to fifteen years or so, I’ve not done so much of the kind of coding I wrote about above. I certainly have done some stuff for work, mostly around packaging other people’s software as snaps or writing noddy little shell scripts. But I lost a lot of the ‘joy’ of coding recently.
Why?
I think a big part is the expectation that I’d make the code available to others. The public scrutiny others give your code may have been a factor. The pressure I felt that I should put my code out and continue to maintain it rather than throw it over the wall wouldn’t have helped.
I think I was so obsessed with doing the ‘right’ thing that coding ‘correctly’ or following standards and making it all maintainable became a cognitive roadblock.
I would start writing something and then begin wondering, ‘How would someone package this up?’ and ‘Am I using modern coding standards, toolkits, and frameworks?’ This held me back from the joy of coding in the first place. I was obsessing too much over other people’s opinions of my code and whether someone else could build and run it.
I never used to care about this stuff for personal projects, and it was a lot more joyful an experience - for me.
I used to have an idea, pick up a text editor and start coding. I missed that.
Realisation
In January this year, Terence Edenwrote about his escapades making a FourSquare-like service using ActivityPub and OpenStreetMap. When he first mentioned this on Mastodon, I grabbed a copy of the code he shared and had a brief look at it.
The code was surprisingly simple, scrappy, kinda working, and written in PHP. I was immediately thrown back twenty years to my terrible ‘Clunky’ code and how much fun it was to throw together.
In February, I bumped into Terence at State of Open Con in London and took the opportunity to quiz him about his creation. We discussed his choice of technology (PHP), and the simple ’thrown together in a day’ nature of the project.
At that point, I had a bit of a light-bulb moment, realising that I could get back to joyful coding. I don’t have to share everything; not every project needs to be an Open-Source Opus.
I can open a text editor, type some code, and enjoy it, and that’s enough.
Joy Rediscovered
I had an idea for a web application and wanted to prototype something without too much technological research or overhead. So I created a folder on my home server, ran php -S 0.0.0.0:9000 in a terminal there, made a skeleton index.php and pointed a browser at the address. Boom! Application created!
I created some horribly insecure and probably unmaintainable PHP that will almost certainly never see the light of day.
I had fun doing it though. Which is really the whole point.
The latest release of uCareSystem, version 24.04.0, introduces enhanced maintenance and cleanup capabilities for Ubuntu and its derivatives. It’s definitely worth exploring the new features As uCareSystem joyfully celebrates its 15th anniversary, its latest release unveils a host of new features that I have incorporated to address the evolving needs since the previous version, 4.4.0Continue reading "Ucaresystem 24.04.0 released"
Over coffee this morning, I stumbled upon simone, a fledgling Open-Source tool for repurposing YouTube videos as blog posts. The Python tool creates a text summary of the video and extracts some contextual frames to illustrate the text.
A neat idea! In my experience, software engineers are often tasked with making demonstration videos, but other engineers commonly prefer consuming the written word over watching a video. I took simone for a spin, to see how well it works. Scroll down and tell me what you think!
I was sat in front of my work laptop, which is a mac, so roughly speaking, this is what I did:
(.venv) $ python src/main.py
Enter YouTube URL: https://www.youtube.com/watch?v=VDIAHEoECfM
/Users/alan/Work/rajtilakjee/simone/.venv/lib/python3.12/site-packages/whisper/transcribe.py:115: UserWarning: FP16 is not supported on CPU; using FP32 instead
warnings.warn("FP16 is not supported on CPU; using FP32 instead")Traceback (most recent call last):
File "/Users/alan/Work/rajtilakjee/simone/.venv/lib/python3.12/site-packages/pytesseract/pytesseract.py", line 255, in run_tesseract
proc = subprocess.Popen(cmd_args, **subprocess_args()) ^^^^^^^^^^^^^^^^^^^^^^^^^^^^^^^^^^^^^^^^^^^^^^^
File "/opt/homebrew/Cellar/python@3.12/3.12.3/Frameworks/Python.framework/Versions/3.12/lib/python3.12/subprocess.py", line 1026, in __init__
self._execute_child(args, executable, preexec_fn, close_fds,
File "/opt/homebrew/Cellar/python@3.12/3.12.3/Frameworks/Python.framework/Versions/3.12/lib/python3.12/subprocess.py", line 1955, in _execute_child
raise child_exception_type(errno_num, err_msg, err_filename)FileNotFoundError: [Errno 2] No such file or directory: 'C:/Program Files/Tesseract-OCR/tesseract.exe'During handling of the above exception, another exception occurred:
Traceback (most recent call last):
File "/Users/alan/Work/rajtilakjee/simone/src/main.py", line 47, in <module>
blogpost(url) File "/Users/alan/Work/rajtilakjee/simone/src/main.py", line 39, in blogpost
score = scores.score_frames() ^^^^^^^^^^^^^^^^^^^^^
File "/Users/alan/Work/rajtilakjee/simone/src/utils/scorer.py", line 20, in score_frames
extracted_text = pytesseract.image_to_string( ^^^^^^^^^^^^^^^^^^^^^^^^^^^^
File "/Users/alan/Work/rajtilakjee/simone/.venv/lib/python3.12/site-packages/pytesseract/pytesseract.py", line 423, in image_to_string
return{ ^
File "/Users/alan/Work/rajtilakjee/simone/.venv/lib/python3.12/site-packages/pytesseract/pytesseract.py", line 426, in <lambda>
Output.STRING: lambda: run_and_get_output(*args),
^^^^^^^^^^^^^^^^^^^^^^^^^
File "/Users/alan/Work/rajtilakjee/simone/.venv/lib/python3.12/site-packages/pytesseract/pytesseract.py", line 288, in run_and_get_output
run_tesseract(**kwargs) File "/Users/alan/Work/rajtilakjee/simone/.venv/lib/python3.12/site-packages/pytesseract/pytesseract.py", line 260, in run_tesseract
raise TesseractNotFoundError()pytesseract.pytesseract.TesseractNotFoundError: C:/Program Files/Tesseract-OCR/tesseract.exe is not installed or it's not in your PATH. See README file for more information.
(.venv) python src/main.py
Enter YouTube URL: https://www.youtube.com/watch?v=VDIAHEoECfM
/Users/alan/Work/rajtilakjee/simone/.venv/lib/python3.12/site-packages/whisper/transcribe.py:115: UserWarning: FP16 is not supported on CPU; using FP32 instead
 warnings.warn("FP16 is not supported on CPU; using FP32 instead")
Look for results
(.venv) $ ls -l generated_blogpost.txt *.jpg
-rw-r--r-- 1 alan staff 216326 Apr 09:26 generated_blogpost.txt
-rw-r--r--@ 1 alan staff 13298426 Apr 09:27 top_frame_4_score_106.jpg
-rw-r--r-- 1 alan staff 18470526 Apr 09:27 top_frame_5_score_105.jpg
-rw-r--r-- 1 alan staff 12614826 Apr 09:27 top_frame_9_score_101.jpg
In my test I pointed simone at a short demo video from my employer, Anchore’sYouTube channel. The results are below, with no editing, I even included the typos. The images at the bottom of this post are frames from the video that simone selected.
Static stick checker tool helps developers identify security vulnerabilities in Docker images by running open-source security checks and generating remediation recommendations. This blog post summarizes a live demo of the tool’s capabilities.
How it works
The tool works by:
Downloading and analyzing the Docker image.
Detecting the base operating system distribution and selecting the appropriate stick profile.
Running open-source security checks on the image.
Generating a report of identified vulnerabilities and remediation actions.
Demo Walkthrough
The demo showcases the following steps:
Image preparation: Uploading a Docker image to a registry.
Tool execution: Running the static stick checker tool against the image.
Results viewing: Analyzing the generated stick results and identifying vulnerabilities.
Remediation: Implementing suggested remediation actions by modifying the Dockerfile.
Re-checking: Running the tool again to verify that the fixes have been effective.
Key findings
The static stick checker tool identified vulnerabilities in the Docker image in areas such as:
Verifying file hash integrity.
Configuring cryptography policy.
Verifying file permissions.
Remediation scripts were provided to address each vulnerability.
By implementing the recommended changes, the security posture of the Docker image was improved.
Benefits of using the static stick checker tool
Identify security vulnerabilities early in the development process.
Automate the remediation process.
Shift security checks leftward in the development pipeline.
Reduce the burden on security teams by addressing vulnerabilities before deployment.
Conclusion
The Ancors static stick checker tool provides a valuable tool for developers to improve the security of their Docker images. By proactively addressing vulnerabilities during the development process, organizations can ensure their applications are secure and reduce the risk of security incidents
Here’s the images it pulled out:
Not bad! It could be better - getting the company name wrong, for one!
I can imagine using this to create a YouTube description, or use it as a skeleton from which a blog post could be created. I certainly wouldn’t just pipe the output of this into blog posts! But so many videos need better descriptions, and this could help!
Ubuntu 24.04 LTS, codenamed “Noble Numbat”, is here. This release continues Ubuntu’s proud tradition of integrating the latest and greatest open source technologies into a high-quality, easy-to-use Linux distribution. The team has been hard at work through this cycle, together with the community and our partners, to introduce new features and fix bugs.
Our 10th Long Term Supported release sets a new standard in performance engineering, enterprise security and developer experience.
Ubuntu Desktop brings the Subiquity installer to an LTS for the first time. In addition to a refreshed user experience and a minimal install by default, the installer now includes experimental support for ZFS and TPM-based full disk encryption and the ability to import auto-install configurations. Post install, users will be greeted with the latest GNOME 46 alongside a new App Center and firmware-updater. Netplan is now the default for networking configuration and supports bidirectionality with NetworkManager.
Ubuntu now enables frame pointers by default on 64-bit architectures to enable CPU and off-CPU profiling for workload optimisation, alongside a suite of critical performance tools pre-installed. The Linux 6.8 kernel now enables low-latency features by default. For IoT vendors leveraging 32-bit arm hardware, our armhf build has been updated to resolve the upcoming 2038 issue by implementing 64-bit time_t in all necessary packages.
As always, Ubuntu ships with the latest toolchain versions. .NET 8 is now fully supported on Ubuntu 24.04 LTS (and Ubuntu 22.04 LTS) for the full lifecycle of the release and OpenJDK 21 and 17 are both TCK certified to adhere to Java interoperability standards. Ubuntu 24.04 LTS ships Rust 1.75 and a simpler Rust toolchain snap framework to enable future rust versions to be delivered to developers on this release in years to come.
The newest Edubuntu, Kubuntu, Lubuntu, Ubuntu Budgie, Ubuntu Cinnamon, Ubuntu Kylin, Ubuntu MATE, Ubuntu Studio, Ubuntu Unity, and Xubuntu are also being released today. More details can be found for these at their individual release notes under the Official Flavours section:
Maintenance updates will be provided for 5 years for Ubuntu Desktop, Ubuntu Server, Ubuntu Cloud and Ubuntu Core. All the remaining flavours will be supported for 3 years. Additional security support is available with ESM (Extended Security Maintenance).
Users of Ubuntu 23.10 will soon be offered an automatic upgrade to 24.04. Users of 22.04 LTS will be offered the automatic upgrade when 24.04.1 LTS is released, which is scheduled for the 15th of August. For further information about upgrading, see:
As always, upgrades to the latest version of Ubuntu are entirely free of charge.
We recommend that all users read the release notes, which document caveats and workarounds for known issues, and provide more in-depth information on the release itself. They are available at:
Ubuntu is a full-featured Linux distribution for desktops, laptops, IoT, cloud, and servers, with a fast and easy installation and regular releases. A tightly-integrated selection of excellent applications is included, and an incredible variety of add-on software is just a few clicks away.
Professional services including support are available from Canonical and hundreds of other companies around the world. For more information about support, visit:
The Kubuntu Team is happy to announce that Kubuntu 24.04 has been released, featuring the ‘beautiful’ KDE Plasma 5.27 simple by default, powerful when needed.
Codenamed “Noble Numbat”, Kubuntu 24.04 continues our tradition of giving you Friendly Computing by integrating the latest and greatest open source technologies into a high-quality, easy-to-use Linux distribution.
Note: For upgrades from 23.10, there may a delay of a few hours to days between the official release announcements and the Ubuntu Release Team enabling upgrades.
The Ubuntu Studio team is pleased to announce the release of Ubuntu Studio 24.04 LTS, code-named “Noble Numbat”. This marks Ubuntu Studio’s 34th release. This release is a Long-Term Support release and as such, it is supported for 3 years (36 months, until April 2027).
Since it’s just out, you may experience some issues, so you might want to wait a bit before upgrading. Please see the release notes for a more complete list of changes and known issues. Listed here are some of the major highlights.
You can download Ubuntu Studio 24.04 LTS from our download page.
Special Notes
The Ubuntu Studio 24.04 LTS disk image (ISO) exceeds 4 GB and cannot be downloaded to some file systems such as FAT32 and may not be readable when burned to a standard DVD. For this reason, we recommend downloading to a compatible file system. When creating a boot medium, we recommend creating a bootable USB stick with the ISO image or burning to a Dual-Layer DVD.
Minimum installation media requirements: Dual-Layer DVD or 8GB USB drive.
Full updated information, including Upgrade Instructions, are available in the Release Notes.
Please note that upgrading from 22.04 before the release of 24.04.1,due August 2024, is unsupported.
Upgrades from 23.10 should be enabled within a month after release, so we appreciate your patience.
New This Release
All-New System Installer
In cooperation with the Ubuntu Desktop Team, we have an all-new Desktop installer. This installer uses the underlying code of the Ubuntu Server installer (“Subiquity”) which has been in-use for years, with a frontend coded in “Flutter”. This took a large amount of work for this release, and we were able to help a lot of other official Ubuntu flavors transition to this new installer.
Be on the lookout for a special easter egg when the graphical environment for the installer first starts. For those of you who have been long-time users of Ubuntu Studio since our early days (even before Xfce!), you will notice exactly what it is.
PipeWire 1.0.4
Now for the big one: PipeWire is now mature, and this release contains PipeWire 1.0. With PipeWire 1.0 comes the stability and compatibility you would expect from multimedia audio. In fact, at this point, we recommend PipeWire usage for both Professional, Prosumer, and Everyday audio needs. At Ubuntu Summit 2023 in Riga, Latvia, our project leader Erich Eickmeyer used PipeWire to demonstrate live audio mixing with much success and has since done some audio mastering work using it. JACK developers even consider it to be “JACK 3”.
PipeWire’s JACK compatibility is configured to use out-of-the-box and is zero-latency internally. System latency is configurable via Ubuntu Studio Audio Configuration.
However, if you would rather use straight JACK 2 instead, that’s also possible. Ubuntu Studio Audio Configuration can disable and enable PipeWire’s JACK compatibility on-the-fly. From there, you can simply use JACK via QJackCtl.
With this, we consider audio production with Ubuntu Studio so mature that it can now rival operating systems such as macOS and Windows in ease-of-use since it’s ready to go out-of-the-box.
Deprecation of PulseAudio/JACK setup/Studio Controls
Due to the maturity of PipeWire, we now consider the traditional PulseAudio/JACK setup, where JACK would be started/stopped by Studio Controls and bridged to PulseAudio, deprecated. This configuration is still installable via Ubuntu Studio Audio Configuration, but we do not recommend it. Studio Controls may return someday as a PipeWire fine-tuning solution, but for now it is unsupported by the developer. For that reason, we recommend users not use this configuration. If you do, it is at your own risk and no support will be given. In fact, it’s likely to be dropped for 24.10.
Ardour 8.4
While this does not represent the latest release of Ardour, Ardour 8.4 is a great release. If you would like the latest release, we highly recommend purchasing one-time or subscribing to Ardour directly from the developers to help support this wonderful application. Also, for that reason, this will be an application we will not directly backport. More on that later.
Ubuntu Studio Audio Configuration
Ubuntu Studio Audio Configuration has undergone a UI overhaul and contains the ability to start and stop a Dummy Audio Device which can also be configured to start or stop upon login. When assigned as the default, this will free-up channels that would normally be assigned to your system audio to be assigned to a null device.
Meta Package for Music Education
In cooperation with Edubuntu, we have created a metapackage for music education. This package is installable from Ubuntu Studio Installer and includes the following packages:
FMIT: Free Musical Instrument Tuner, a tool for tuning musical Instruments (also included by default)
GNOME Metronome: Exactly what it sounds like (pun unintended): a metronome.
Minuet: Ear training for intervals, chords, scales, and more.
MuseScore: Create, playback, and print sheet music for free (this one is no stranger to the Ubuntu Studio community)
Piano Booster: MIDI player/game that displays musical notes and teaches you how to play piano, optionally using a MIDI keyboard.
Solfege: Ear training program for harmonic and melodic intervals, chords, scales, and rhythms.
Deprecation of Ubuntu Studio Backports Is In Effect
As stated in the Ubuntu 23.10 Release Announcement, the Ubuntu Studio Backports PPA is now deprecated in favor of the official Ubuntu Backports repository. However, the Backports repository only works for LTS releases and for good reason. There are a few requirements for backporting:
It must be an application which already exists in the Ubuntu repositories
It must be an application which would not otherwise qualify for a simple bugfix, which would then qualify it to be a Stable Release Update. This means it must have new features.
It must not rely on new libraries or new versions of libraries.
It must exist within a later supported release or the development release of Ubuntu.
If you have a suggestion for an application for which to backport that meets those requirements, feel free to join and email the Ubuntu Studio Users Mailing List with your suggestion with the tag “[BPO]” at the beginning of the subject line. Backports to 22.04 LTS are now closedand backports to 24.04 LTS are now open. Additionally, suggestions must pertain to Ubuntu Studio and preferably must be applications included with Ubuntu Studio. Suggestions can be rejected at the Project Leader’s discretion.
One package that is exempt to backporting is Ardour. To help support Ardour’s funding, you may obtain later versions directly from them. To do so, please one-time purchase or subscribe to Ardour from their website. If you wish to get later versions of Ardour from us, you will have to wait until the next regular release of Ubuntu Studio, due in October 2024.
We’re back on Matrix
You’ll notice that the menu links to our support chat and on our website will now take you to a Matrix chat. This is due to the Ubuntu community carving its own space within the Matrix federation.
However, this is not only a support chat. This is also a creativity discussion chat. You can pass ideas to each other and you’re welcome to it if the topic remains within those confines. However, if a moderator or admin warns you that you’re getting off-topic (or the intention for the chat room), please heed the warning.
This is a persistent connection, meaning if you close the window (or chat), it won’t lose your place as you may only need to sign back in to resume the chat.
Frequently Asked Questions
Q: Does Ubuntu Studio contain snaps? A: Yes. Mozilla’s distribution agreement with Canonical changed, and Ubuntu was forced to no longer distribute Firefox in a native .deb package. We have found that, after numerous improvements, Firefox now performs just as well as the native .deb package did.
Thunderbird also became a snap during this cycle for the maintainers to get security patches delivered faster.
Additionally, Freeshow is an Electron-based application. Electron-based applications cannot be packaged in the Ubuntu repositories in that they cannot be packaged in a traditional Debian source package. While such apps do have a build system to create a .deb binary package, it circumvents the source package build system in Launchpad, which is required when packaging for Ubuntu. However, Electron apps also have a facility for creating snaps, which can be uploaded and included. Therefore, for Freeshow to be included in Ubuntu Studio, it had to be packaged as a snap.
Q: Will you make an ISO with {my favorite desktop environment}? A: To do so would require creating an entirely new flavor of Ubuntu, which would require going through the Official Ubuntu Flavor application process. Since we’re completely volunteer-run, we don’t have the time or resources to do this. Instead, we recommend you download the official flavor for the desktop environment of your choice and use Ubuntu Studio Installer to get Ubuntu Studio – which does *not* convert that flavor to Ubuntu Studio but adds its benefits.
Q: What if I don’t want all these packages installed on my machine? A: Simply use the Ubuntu Studio Installer to remove the features of Ubuntu Studio you don’t want or need!
Looking Toward the Future
Plasma 6
Ubuntu Studio, in cooperation with Kubuntu, will be switching to Plasma 6 during the 24.10 development cycle. Likewise, Lubuntu will be switching to LXQt 2.0 and Qt 6, so the three flavors will be cooperating to do the move.
New Look
Ubuntu Studio has been using the same theming, “Materia” (except for the 22.04 LTS release which was a re-colored Breeze theme) since 19.04. However, Materia has gone dead upstream. To stay consistent, we found a fork called “Orchis” which seems to match closely and will be switching to that. More on that soon.
Minimal Installation
The new system installer has the capability to do minimal installations. This was something we did not have time to implement this cycle but intend to do for 24.10. This will let users install a minimal desktop to get going and then install what they need via Ubuntu Studio Installer. This will make a faster installation process but will not make the installation .iso image smaller. However, we have an idea for that as well.
Minimal Installation .iso Image
We are going to research what it will take to create a minimal installer .iso image that will function much like the regular .iso image minus the ability to install everything and allow the user to customize the installation via Ubuntu Studio Installer. This should lead to a much smaller initial download. Unlike creating a version with a different desktop environment, the Ubuntu Technical Board has been on record as saying this would not require going through the new flavor creation process. Our friends at Xubuntu recently did something similar.
Get Involved!
A wonderful way to contribute is to get involved with the project directly! We’re always looking for new volunteers to help with packaging, documentation, tutorials, user support, and MORE! Check out all the ways you can contribute!
Our project leader, Erich Eickmeyer, is now working on Ubuntu Studio at least part-time, and is hoping that the users of Ubuntu Studio can give enough to generate a monthly part-time income. Your donations are appreciated! If other distributions can do it, surely we can! See the sidebar for ways to give!
Special Thanks
Huge special thanks for this release go to:
Eylul Dogruel: Artwork, Graphics Design
Ross Gammon: Upstream Debian Developer, Testing, Email Support
Sebastien Ramacher:Upstream Debian Developer
Dennis Braun: Upstream Debian Developer
Rik Mills: Kubuntu Council Member, help with Plasma desktop
Scarlett Moore: Kubuntu Project Lead, help with Plasma desktop
Zixing Liu: Simplified Chinese translations in the installer
Simon Quigley: Lubuntu Release Manager, help with Qt items, Core Developer stuff, keeping Erich sane and focused
Steve Langasek: Help with livecd-rootfs changes to make the new installer work properly.
Dan Bungert: Subiquity, seed fixes
Dennis Loose: Ubuntu Desktop Provision (installer)
Mauro Gaspari: Tutorials, Promotion, and Documentation, Testing, keeping Erich sane
Krytarik Raido: IRC Moderator, Mailing List Moderator
Erich Eickmeyer: Project Leader, Packaging, Development, Direction, Treasurer
A Note from the Project Leader
When I started out working on Ubuntu Studio six years ago, I had a vision of making it not only the easiest Linux-based operating system for content creation, but the easiest content creation operating system… full-stop.
With the release of Ubuntu Studio 24.04 LTS, I believe we have achieved that goal. No longer do we have to worry about whether an application is JACK or PulseAudio or… whatever. It all just works! Audio applications can be patched to each other!
If an audio device doesn’t depend on complex drivers (i.e. if the device is class-compliant), it will just work. If a user wishes to lower the latency or change the sample rate, we have a utility that does that (Ubuntu Studio Audio Configuration). If a user wants to have finer control use pure JACK via QJackCtl, they can do that too!
I honestly don’t know how I would replicate this on Windows, and replicating on macOS would be much harder without downloading all sorts of applications. With Ubuntu Studio 24.04 LTS, it’s ready to go and you don’t have to worry about it.
Where we are now is a dream come true for me, and something I’ve been hoping to see Ubuntu Studio become. And now, we’re finally here, and I feel like it can only get better.
Ubuntu MATE 24.04 is more of what you like, stable MATE Desktop on top of current Ubuntu.
This release rolls up some fixes and more closely aligns with Ubuntu. Read on to learn more 👓️
Ubuntu MATE 24.04 LTS
Thank you! 🙇
I’d like to extend my sincere thanks to everyone who has played an active role in improving Ubuntu MATE for this release 👏
I’d like to acknowledge the close collaboration with all the Ubuntu flavour teams and the Ubuntu Foundations and Desktop Teams.
The assistance and support provided by Erich Eickmeyer (Ubuntu Studio), Simon Quigley (Lubuntu) and David Muhammed (Ubuntu Budgie) have been invaluable.
Thank you! 💚
There are no offline upgrade options for Ubuntu MATE. Please ensure you have
network connectivity to one of the official mirrors or to a locally accessible
mirror and follow the instructions above.
We are pleased to announce the release of the next version of our distro, 24.04 Long Term Support. The LTS version is supported for 3 years while the regular releases are supported for 9 months. The new release rolls-up various fixes and optimizations that the Ubuntu Budgie team have been released since the 22.04 release in April 2022: We also inherits hundreds of stability…
Thanks to the hard work from our contributors, Lubuntu 24.04 LTS has been released. With the codename Noble Numbat, Lubuntu 24.04 is the 26th release of Lubuntu, the 12th release of Lubuntu with LXQt as the default desktop environment. Download and Support Lifespan With Lubuntu 24.04 being a long-term support interim release, it will follow […]
The Xubuntu team is happy to announce the immediate release of Xubuntu 24.04.
Xubuntu 24.04, codenamed Noble Numbat, is a long-term support (LTS) release and will be supported for 3 years, until 2027.
Xubuntu 24.04, featuring the latest updates from Xfce 4.18 and GNOME 46.
Xubuntu 24.04 features the latest updates from Xfce 4.18, GNOME 46, and MATE 1.26. For new users and those coming from Xubuntu 22.04, you’ll appreciate the performance, stability, and improved hardware support found in Xubuntu 24.04. Xfce 4.18 is stable, fast, and full of user-friendly features. Enjoy frictionless bluetooth headphone connections and out-of-the-box touchpad support. Updates to our icon theme and wallpapers make Xubuntu feel fresh and stylish.
The final release images for Xubuntu Desktop and Xubuntu Minimal are available as torrents and direct downloads from xubuntu.org/download/.
As the main server might be busy in the first few days after the release, we recommend using the torrents if possible.
We’d like to thank everybody who contributed to this release of Xubuntu!
Highlights and Known Issues
Highlights
Xfce 4.18 is included and well-polished since it’s initial release in December 2022
Xubuntu Minimal is included as an officially supported subproject
GNOME Software has been replaced by Snap Store and GDebi
Snap Desktop Integration is now included for improved snap package support
Firmware Updater has been added to enable firmware updates in Xubuntu is included to support firmware updates from the Linux Vendor Firmware Service (LVFS)
Thunderbird is now distributed as a Snap package
Ubiquity has been replaced by the Flutter-based Ubuntu Installer to provide fast and user-friendly installation
Pipewire (and wireplumber) are now included in Xubuntu
Improved hardware support for bluetooth headphones and touchpads
Color emoji is now included and supported in Firefox, Thunderbird, and newer Gtk-based apps
Significantly improved screensaver integration and stability
Known Issues
The shutdown prompt may not be displayed at the end of the installation. Instead you might just see a Xubuntu logo, a black screen with an underscore in the upper left hand corner, or just a black screen. Press Enter and the system will reboot into the installed environment. (LP: #1944519)
Xorg crashes and the user is logged out after logging in or switching users on some virtual machines, including GNOME Boxes. (LP: #1861609)
You may experience choppy audio or poor system performance while playing audio, but only in some virtual machines (observed in VMware and VirtualBox)
OEM installation options are not currently supported or available, but will be included for Xubuntu 24.04.1
For more obscure known issues, information on affecting bugs, bug fixes, and a list of new package versions, please refer to the Xubuntu Release Notes.
The main Ubuntu Release Notes cover many of the other packages we carry and more generic issues.
Support
For support with the release, navigate to Help & Support for a complete list of methods to get help.
With the work that has been done in the debian-installer/netcfg merge-proposal !9 it is possible to install a standard Debian system, using the normal Debian-Installer (d-i) mini.iso images, that will come pre-installed with Netplan and all network configuration structured in /etc/netplan/.
In this write-up, I’d like to run you through a list of commands for experiencing the Netplan enabled installation process first-hand. For now, we’ll be using a custom ISO image, while waiting for the above-mentioned merge-proposal to be landed. Furthermore, as the Debian archive is going through major transitions builds of the “unstable” branch of d-i don’t currently work. So I implemented a small backport, producing updated netcfg and netcfg-static for Bookworm, which can be used as localudebs/ during the d-i build.
Let’s start with preparing a working directory and installing the software dependencies for our virtualized Debian system:
Next we’ll prepare a VM, by copying the EFI firmware files, preparing some persistent EFIVARs file, to boot from FS0:\EFI\debian\grubx64.efi, and create a virtual disk for our machine:
Finally, let’s launch the installer using a custom preseed.cfg file, that will automatically install Netplan for us in the target system. A minimal preseed file could look like this:
For this demo, we’re installing the full netplan.io package (incl. Python CLI), as the netplan-generator package was not yet split out as an independent binary in the Bookworm cycle. You can choose the preseed file from a set of different variants to test the different configurations:
We’re using the custom linux kernel and initrd.gz here to be able to pass the preseed URL as a parameter to the kernel’s cmdline directly. Launching this VM should bring up the normal debian-installer in its netboot/gtk form:
Now you can click through the normal Debian-Installer process, using mostly default settings. Optionally, you could play around with the networking settings, to see how those get translated to /etc/netplan/ in the target system.
After you confirmed your partitioning changes, the base system gets installed. I suggest not to select any additional components, like desktop environments, to speed up the process.
During the final step of the installation (finish-install.d/55netcfg-copy-config) d-i will detect that Netplan was installed in the target system (due to the preseed file provided) and opt to write its network configuration to /etc/netplan/ instead of /etc/network/interfaces or /etc/NetworkManager/system-connections/.
Done! After the installation finished, you can reboot into your virgin Debian Bookworm system.
To do that, quit the current Qemu process, by pressing Ctrl+C and make sure to copy over the EFIVARS.fd file that was written by grub during the installation, so Qemu can find the new system. Then reboot into the new system, not using the mini.iso image any more:
Finally, you can play around with your Netplan enabled Debian system! As you will find, /etc/network/interfaces exists but is empty, it could still be used (optionally/additionally). Netplan was configured in /etc/netplan/ according to the settings given during the d-i installation process.
In our case, we also installed the Netplan CLI, so we can play around with some of its features, like netplan status:
Thank you for following along the Netplan enabled Debian installation process and happy hacking! If you want to learn more, join the discussion at Salsa:installer-team/netcfg and find us at GitHub:netplan.
Desta vez recebemos a visita do André Bação e a conversa seguiu animada em torno de leis de termodinâmica, panelas de esquentadores, alegria de famílias chinesas, computadores azeiteiros e - como não podia deixar de ser - casas espertas. Ainda falámos da última beta de Ubuntu 24.04 e descobrimos que há empacotadores chamados Carlão. Nos próximos dias vai haver muita celebração da Liberdade na comunidade do Software Livre e todos vamos querer lá estar! 25 de Abril Sempre, Software Proprietário Nunca Mais!
Podem apoiar o podcast usando os links de afiliados do Humble Bundle, porque ao usarem esses links para fazer uma compra, uma parte do valor que pagam reverte a favor do Podcast Ubuntu Portugal.
E podem obter tudo isso com 15 dólares ou diferentes partes dependendo de pagarem 1, ou 8.
Achamos que isto vale bem mais do que 15 dólares, pelo que se puderem paguem mais um pouco mais visto que têm a opção de pagar o quanto quiserem.
Se estiverem interessados em outros bundles não listados nas notas usem o link https://www.humblebundle.com/?partner=PUP e vão estar também a apoiar-nos.
Ubuntu MATE 23.10 is more of what you like, stable MATE Desktop on top of current Ubuntu.
This release rolls up a number of bugs fixes and updates that continues to build on recent releases, where the focus has been on improving stability 🪨
Ubuntu MATE 23.10
Thank you! 🙇
I’d like to extend my sincere thanks to everyone who has played an active role in improving Ubuntu MATE for this release 👏 From reporting bugs, submitting translations, providing patches, contributing to our crowd-funding, developing new features, creating artwork, offering community support, actively
testing and providing QA feedback to writing documentation or creating this fabulous website. Thank you! 💚
MATE Desktop has been updated to 1.26.2 with a selection of bugs fixes 🐛 and minor improvements 🩹 to associated components.
caja-rename 23.10.1-1 has been ported from Python to C.
libmatemixer 1.26.0-2+deb12u1 resolves heap corruption and application crashes when removing USB audio devices.
mate-desktop 1.26.2-1 improves portals support.
mate-notification-daemon 1.26.1-1 fixes several memory leaks.
mate-system-monitor 1.26.0-5 now picks up libexec files from /usr/libexec
mate-session-manager 1.26.1-2 set LIBEXECDIR to /usr/libexec/ for correct interaction with mate-system-monitor ☝️
mate-user-guide 1.26.2-1 is a new upstream release.
mate-utils 1.26.1-1 fixes several memory leaks.
Yet more AI Generated wallpaper
My friend Simon Butcher 🇬🇧 is Head of Research Platforms at Queen Mary University of London managing the Apocrita HPC cluster service. Once again, Simon has created a stunning AI-generated 🤖🧠 wallpaper for Ubuntu MATE using bleeding edge diffusion models 🖌 The sample below is 1920x1080 but the version included in Ubuntu MATE 23.10 are 3840x2160.
Here’s what Simon has to say about the process of creating this new wallpaper for Mantic Minotaur:
Since Minotaurs are imaginary creatures, interpretations tend to vary widely. I wanted to produce an image of a powerful creature in a graphic novel style, although not gruesome like many depictions. The latest open source Stable Diffusion XL base model was trained at a higher resolution and the difference in quality has been noticeable, particularly at better overall consistency and detail, while reducing anatomical irregularities in images. The image was produced locally using Linux and an NVIDIA A100 80GB GPU, starting from an initial text prompt and refined using img2img, inpainting and upscaling features.
Major Applications
Accompanying MATE Desktop 1.26.2 🧉 and Linux 6.5 🐧 are Firefox 118 🔥🦊,
Celluloid 0.25 🎥, Evolution 3.50 📧, LibreOffice 7.6.1 📚
See the Ubuntu 23.10 Release Notes
for details of all the changes and improvements that Ubuntu MATE benefits from.
Download Ubuntu MATE 23.10
This new release will be first available for PC/Mac users.
You can upgrade to Ubuntu MATE 23.10 from Ubuntu MATE 23.04. Ensure that you
have all updates installed for your current version of Ubuntu MATE before you
upgrade.
Open the “Software & Updates” from the Control Center.
Select the 3rd Tab called “Updates”.
Set the “Notify me of a new Ubuntu version” drop down menu to “For any new version”.
Press Alt+F2 and type in update-manager -c -d into the command box.
Update Manager should open up and tell you: New distribution release ‘23.10’ is available.
If not, you can use /usr/lib/ubuntu-release-upgrader/check-new-release-gtk
Click “Upgrade” and follow the on-screen instructions.
There are no offline upgrade options for Ubuntu MATE. Please ensure you have
network connectivity to one of the official mirrors or to a locally accessible
mirror and follow the instructions above.
Feedback
Is there anything you can help with or want to be involved in? Maybe you just
want to discuss your experiences or ask the maintainers some questions. Please
come and talk to us.
Por ocasião da Wikicon Portugal 2024 em Évora, caímos numa anomalia gravitacional no tecido espacio-temporal e viajámos até à Quinta Dimensão, um Cosmódromo de Ideias e depósito de Raspberry Pi. Fomos recebidos por João Bacelar (um ser humano da mesma espécie de Carl Sagan), que orbita uma estrela de luminosidade classe V (do tipo espectral G) à velocidade de 30 Km por segundo; técnico de som, criador multimédia, programador, astrónomo amador, rádio amador e entusiasta do Software Livre, estivemos em conversa amena com ele num cenário bucólico e rural, rodeados de bichos vários, banhados por radiação ultra-violeta e neutrinos, debaixo de uma camada de 7 Km de Azoto e Oxigénio à pressão de 1014.7 Hectopascal.
Podem apoiar o podcast usando os links de afiliados do Humble Bundle, porque ao usarem esses links para fazer uma compra, uma parte do valor que pagam reverte a favor do Podcast Ubuntu Portugal.
E podem obter tudo isso com 15 dólares ou diferentes partes dependendo de pagarem 1, ou 8.
Achamos que isto vale bem mais do que 15 dólares, pelo que se puderem paguem mais um pouco mais visto que têm a opção de pagar o quanto quiserem.
Se estiverem interessados em outros bundles não listados nas notas usem o link https://www.humblebundle.com/?partner=PUP e vão estar também a apoiar-nos.
Ubuntu Budgie 24.04 LTS (Noble Numbat) is a Long Term Support release with 3 years of support by your distro maintainers, from April 2024 to May 2027. These release notes showcase the key takeaways for 22.04 upgraders to 24.04. In these release notes the areas covered are: Quarter & half tiling is pretty much self-explaining. Dragging a window to the…
Years ago, at what I think I remember was DebConf 15, I hacked for a while
on debhelper to
write build-ids to debian binary control files,
so that the build-id (more specifically, the ELF note
.note.gnu.build-id) wound up in the Debian apt archive metadata.
I’ve always thought this was super cool, and seeing as how Michael Stapelberg
blogged
some great pointers around the ecosystem, including the fancy new debuginfod
service, and the
find-dbgsym-packages
helper, which uses these same headers, I don’t think I’m the only one.
At work I’ve been using a lot of rust,
specifically, async rust using tokio. To try and work on
my style, and to dig deeper into the how and why of the decisions made in these
frameworks, I’ve decided to hack up a project that I’ve wanted to do ever
since 2015 – write a debug filesystem. Let’s get to it.
Back to the Future
Time to admit something. I really love Plan 9. It’s
just so good. So many ideas from Plan 9 are just so prescient, and everything
just feels right. Not just right like, feels good – like, correct. The
bit that I’ve always liked the most is 9p, the network protocol for serving
a filesystem over a network. This leads to all sorts of fun programs, like the
Plan 9 ftp client being a 9p server – you mount the ftp server and access
files like any other files. It’s kinda like if fuse were more fully a part
of how the operating system worked, but fuse is all running client-side. With
9p there’s a single client, and different servers that you can connect to,
which may be backed by a hard drive, remote resources over something like SFTP, FTP, HTTP or even purely synthetic.
The interesting (maybe sad?) part here is that 9p wound up outliving Plan 9
in terms of adoption – 9p is in all sorts of places folks don’t usually expect.
For instance, the Windows Subsystem for Linux uses the 9p protocol to share
files between Windows and Linux. ChromeOS uses it to share files with Crostini,
and qemu uses 9p (virtio-p9) to share files between guest and host. If you’re
noticing a pattern here, you’d be right; for some reason 9p is the go-to protocol
to exchange files between hypervisor and guest. Why? I have no idea, except maybe
due to being designed well, simple to implement, and it’s a lot easier to validate the data being shared
and validate security boundaries. Simplicity has its value.
As a result, there’s a lot of lingering 9p support kicking around. Turns out
Linux can even handle mounting 9p filesystems out of the box. This means that I
can deploy a filesystem to my LAN or my localhost by running a process on top
of a computer that needs nothing special, and mount it over the network on an
unmodified machine – unlike fuse, where you’d need client-specific software
to run in order to mount the directory. For instance, let’s mount a 9p
filesystem running on my localhost machine, serving requests on 127.0.0.1:564
(tcp) that goes by the name “mountpointname” to /mnt.
Linux will mount away, and attach to the filesystem as the root user, and by default,
attach to that mountpoint again for each local user that attempts to use
it. Nifty, right? I think so. The server is able
to keep track of per-user access and authorization
along with the host OS.
WHEREIN I STYX WITH IT
Since I wanted to push myself a bit more with rust and tokio specifically,
I opted to implement the whole stack myself, without third party libraries on
the critical path where I could avoid it. The 9p protocol (sometimes called
Styx, the original name for it) is incredibly simple. It’s a series of client
to server requests, which receive a server to client response. These are,
respectively, “T” messages, which transmit a request to the server, which
trigger an “R” message in response (Reply messages). These messages are
TLV payload
with a very straight forward structure – so straight forward, in fact, that I
was able to implement a working server off nothing more than a handful of man
pages.
Later on after the basics worked, I found a more complete
spec page
that contains more information about the
unix specific variant
that I opted to use (9P2000.u rather than 9P2000) due to the level
of Linux specific support for the 9P2000.u variant over the 9P2000
protocol.
MR ROBOTO
The backend stack over at zoo is rust and tokio
running i/o for an HTTP and WebRTC server. I figured I’d pick something
fairly similar to write my filesystem with, since 9P can be implemented
on basically anything with I/O. That means tokio tcp server bits, which
construct and use a 9p server, which has an idiomatic Rusty API that
partially abstracts the raw R and T messages, but not so much as to
cause issues with hiding implementation possibilities. At each abstraction
level, there’s an escape hatch – allowing someone to implement any of
the layers if required. I called this framework
arigato which can be found over on
docs.rs and
crates.io.
/// Simplified version of the arigato File trait; this isn't actually
/// the same trait; there's some small cosmetic differences. The
/// actual trait can be found at:
///
/// https://docs.rs/arigato/latest/arigato/server/trait.File.html
trait File {
/// OpenFile is the type returned by this File via an Open call.
typeOpenFile: OpenFile;
/// Return the 9p Qid for this file. A file is the same if the Qid is
/// the same. A Qid contains information about the mode of the file,
/// version of the file, and a unique 64 bit identifier.
fnqid(&self) -> Qid;
/// Construct the 9p Stat struct with metadata about a file.
async fnstat(&self) -> FileResult<Stat>;
/// Attempt to update the file metadata.
async fnwstat(&mut self, s: &Stat) -> FileResult<()>;
/// Traverse the filesystem tree.
async fnwalk(&self, path: &[&str]) -> FileResult<(Option<Self>, Vec<Self>)>;
/// Request that a file's reference be removed from the file tree.
async fnunlink(&mut self) -> FileResult<()>;
/// Create a file at a specific location in the file tree.
async fncreate(
&mut self,
name: &str,
perm: u16,
ty: FileType,
mode: OpenMode,
extension: &str,
) -> FileResult<Self>;
/// Open the File, returning a handle to the open file, which handles
/// file i/o. This is split into a second type since it is genuinely
/// unrelated -- and the fact that a file is Open or Closed can be
/// handled by the `arigato` server for us.
async fnopen(&mut self, mode: OpenMode) -> FileResult<Self::OpenFile>;
}
/// Simplified version of the arigato OpenFile trait; this isn't actually
/// the same trait; there's some small cosmetic differences. The
/// actual trait can be found at:
///
/// https://docs.rs/arigato/latest/arigato/server/trait.OpenFile.html
trait OpenFile {
/// iounit to report for this file. The iounit reported is used for Read
/// or Write operations to signal, if non-zero, the maximum size that is
/// guaranteed to be transferred atomically.
fniounit(&self) -> u32;
/// Read some number of bytes up to `buf.len()` from the provided
/// `offset` of the underlying file. The number of bytes read is
/// returned.
async fnread_at(
&mut self,
buf: &mut [u8],
offset: u64,
) -> FileResult<u32>;
/// Write some number of bytes up to `buf.len()` from the provided
/// `offset` of the underlying file. The number of bytes written
/// is returned.
fnwrite_at(
&mut self,
buf: &mut [u8],
offset: u64,
) -> FileResult<u32>;
}
Thanks, decade ago paultag!
Let’s do it! Let’s use arigato to implement a 9p filesystem we’ll call
debugfs that will serve all the debug
files shipped according to the Packages metadata from the apt archive. We’ll
fetch the Packages file and construct a filesystem based on the reported
Build-Id entries. For those who don’t know much about how an apt repo
works, here’s the 2-second crash course on what we’re doing. The first is to
fetch the Packages file, which is specific to a binary architecture (such as
amd64, arm64 or riscv64). That architecture is specific to a
component (such as main, contrib or non-free). That component is
specific to a suite, such as stable, unstable or any of its aliases
(bullseye, bookworm, etc). Let’s take a look at the Packages.xz file for
the unstable-debugsuite, maincomponent, for all amd64 binaries.
This will return the Debian-style
rfc2822-like headers,
which is an export of the metadata contained inside each .deb file which
apt (or other tools that can use the apt repo format) use to fetch
information about debs. Let’s take a look at the debug headers for the
netlabel-tools package in unstable – which is a package named
netlabel-tools-dbgsym in unstable-debug.
So here, we can parse the package headers in the Packages.xz file, and store,
for each Build-Id, the Filename where we can fetch the .deb at. Each
.deb contains a number of files – but we’re only really interested in the
files inside the .deb located at or under /usr/lib/debug/.build-id/,
which you can find in debugfs under
rfc822.rs. It’s
crude, and very single-purpose, but I’m feeling a bit lazy.
Who needs dpkg?!
For folks who haven’t seen it yet, a .deb file is a special type of
.ar file, that contains (usually)
three files inside – debian-binary, control.tar.xz and data.tar.xz.
The core of an .ar file is a fixed size (60 byte) entry header,
followed by the specified size number of bytes.
[8 byte .ar file magic]
[60 byte entry header]
[N bytes of data]
[60 byte entry header]
[N bytes of data]
[60 byte entry header]
[N bytes of data]
...
First up was to implement a basic ar parser in
ar.rs. Before we get
into using it to parse a deb, as a quick diversion, let’s break apart a .deb
file by hand – something that is a bit of a rite of passage (or at least it
used to be? I’m getting old) during the Debian nm (new member) process, to take
a look at where exactly the .debug file lives inside the .deb file.
$ ar x netlabel-tools-dbgsym_0.30.0-1+b1_amd64.deb
$ ls
control.tar.xz debian-binary
data.tar.xz netlabel-tools-dbgsym_0.30.0-1+b1_amd64.deb
$ tar --list -f data.tar.xz | grep '.debug$'
./usr/lib/debug/.build-id/e5/9f81f6573dadd5d95a6e4474d9388ab2777e2a.debug
Since we know quite a bit about the structure of a .deb file, and I had to
implement support from scratch anyway, I opted to implement a (very!) basic
debfile parser using HTTP Range requests. HTTP Range requests, if supported by
the server (denoted by a accept-ranges: bytes HTTP header in response to an
HTTP HEAD request to that file) means that we can add a header such as
range: bytes=8-68 to specifically request that the returned GET body be the
byte range provided (in the above case, the bytes starting from byte offset 8
until byte offset 68). This means we can fetch just the ar file entry from
the .deb file until we get to the file inside the .deb we are interested in
(in our case, the data.tar.xz file) – at which point we can request the body
of that file with a final range request. I wound up writing a struct to
handle a read_at-style API surface in
hrange.rs, which
we can pair with ar.rs above and start to find our data in the .deb remotely
without downloading and unpacking the .deb at all.
After we have the body of the data.tar.xz coming back through the HTTP
response, we get to pipe it through an xz decompressor (this kinda sucked in
Rust, since a tokioAsyncRead is not the same as an http Body response is
not the same as std::io::Read, is not the same as an async (or sync)
Iterator is not the same as what the xz2 crate expects; leading me to read
blocks of data to a buffer and stuff them through the decoder by looping over
the buffer for each lzma2 packet in a loop), and tarfile parser (similarly
troublesome). From there we get to iterate over all entries in the tarfile,
stopping when we reach our file of interest. Since we can’t seek, but gdb
needs to, we’ll pull it out of the stream into a Cursor<Vec<u8>> in-memory
and pass a handle to it back to the user.
I was originally hoping to avoid transferring the whole tar file over the
network (and therefore also reading the whole debug file into ram, which
objectively sucks), but quickly hit issues with figuring out a way around
seeking around an xz file. What’s interesting is xz has a great primitive
to solve this specific problem (specifically, use a block size that allows you
to seek to the block as close to your desired seek position just before it,
only discarding at most block size - 1 bytes), but data.tar.xz files
generated by dpkg appear to have a single mega-huge block for the whole file.
I don’t know why I would have expected any different, in retrospect. That means
that this now devolves into the base case of “How do I seek around an lzma2
compressed data stream”; which is a lot more complex of a question.
Thankfully, notoriously brilliant tianon was
nice enough to introduce me to Jon Johnson
who did something super similar – adapted a technique to seek inside a
compressed gzip file, which lets his service
oci.dag.dev
seek through Docker container images super fast based on some prior work
such as soci-snapshotter, gztool, and
zran.c.
He also pulled this party trick off for apk based distros
over at apk.dag.dev, which seems apropos.
Jon was nice enough to publish a lot of his work on this specifically in a
central place under the name “targz”
on his GitHub, which has been a ton of fun to read through.
The gist is that, by dumping the decompressor’s state (window of previous
bytes, in-memory data derived from the last N-1 bytes) at specific
“checkpoints” along with the compressed data stream offset in bytes and
decompressed offset in bytes, one can seek to that checkpoint in the compressed
stream and pick up where you left off – creating a similar “block” mechanism
against the wishes of gzip. It means you’d need to do an O(n) run over the
file, but every request after that will be sped up according to the number
of checkpoints you’ve taken.
Given the complexity of xz and lzma2, I don’t think this is possible
for me at the moment – especially given most of the files I’ll be requesting
will not be loaded from again – especially when I can “just” cache the debug
header by Build-Id. I want to implement this (because I’m generally curious
and Jon has a way of getting someone excited about compression schemes, which
is not a sentence I thought I’d ever say out loud), but for now I’m going to
move on without this optimization. Such a shame, since it kills a lot of the
work that went into seeking around the .deb file in the first place, given
the debian-binary and control.tar.gz members are so small.
The Good
First, the good news right? It works! That’s pretty cool. I’m positive
my younger self would be amused and happy to see this working; as is
current day paultag. Let’s take debugfs out for a spin! First, we need
to mount the filesystem. It even works on an entirely unmodified, stock
Debian box on my LAN, which is huge. Let’s take it for a spin:
And, let’s prove to ourselves that this actually mounted before we go
trying to use it:
$ mount | grep build-id
192.168.0.2 on /usr/lib/debug/.build-id type 9p (rw,relatime,aname=unstable-debug,access=user,trans=tcp,version=9p2000.u,port=564)
Slick. We’ve got an open connection to the server, where our host
will keep a connection alive as root, attached to the filesystem provided
in aname. Let’s take a look at it.
$ ls /usr/lib/debug/.build-id/
00 0d 1a 27 34 41 4e 5b 68 75 82 8E 9b a8 b5 c2 CE db e7 f3
01 0e 1b 28 35 42 4f 5c 69 76 83 8f 9c a9 b6 c3 cf dc E7 f4
02 0f 1c 29 36 43 50 5d 6a 77 84 90 9d aa b7 c4 d0 dd e8 f5
03 10 1d 2a 37 44 51 5e 6b 78 85 91 9e ab b8 c5 d1 de e9 f6
04 11 1e 2b 38 45 52 5f 6c 79 86 92 9f ac b9 c6 d2 df ea f7
05 12 1f 2c 39 46 53 60 6d 7a 87 93 a0 ad ba c7 d3 e0 eb f8
06 13 20 2d 3a 47 54 61 6e 7b 88 94 a1 ae bb c8 d4 e1 ec f9
07 14 21 2e 3b 48 55 62 6f 7c 89 95 a2 af bc c9 d5 e2 ed fa
08 15 22 2f 3c 49 56 63 70 7d 8a 96 a3 b0 bd ca d6 e3 ee fb
09 16 23 30 3d 4a 57 64 71 7e 8b 97 a4 b1 be cb d7 e4 ef fc
0a 17 24 31 3e 4b 58 65 72 7f 8c 98 a5 b2 bf cc d8 E4 f0 fd
0b 18 25 32 3f 4c 59 66 73 80 8d 99 a6 b3 c0 cd d9 e5 f1 fe
0c 19 26 33 40 4d 5a 67 74 81 8e 9a a7 b4 c1 ce da e6 f2 ff
Outstanding. Let’s try using gdb to debug a binary that was provided by
the Debian archive, and see if it’ll load the ELF by build-id from the
right .deb in the unstable-debug suite:
$ gdb -q /usr/sbin/netlabelctl
Reading symbols from /usr/sbin/netlabelctl...
Reading symbols from /usr/lib/debug/.build-id/e5/9f81f6573dadd5d95a6e4474d9388ab2777e2a.debug...
(gdb)
Yes! Yes it will!
$ file /usr/lib/debug/.build-id/e5/9f81f6573dadd5d95a6e4474d9388ab2777e2a.debug
/usr/lib/debug/.build-id/e5/9f81f6573dadd5d95a6e4474d9388ab2777e2a.debug: ELF 64-bit LSB shared object, x86-64, version 1 (SYSV), dynamically linked, interpreter *empty*, BuildID[sha1]=e59f81f6573dadd5d95a6e4474d9388ab2777e2a, for GNU/Linux 3.2.0, with debug_info, not stripped
The Bad
Linux’s support for 9p is mainline, which is great, but it’s not robust.
Network issues or server restarts will wedge the mountpoint (Linux can’t
reconnect when the tcp connection breaks), and things that work fine on local
filesystems get translated in a way that causes a lot of network chatter – for
instance, just due to the way the syscalls are translated, doing an ls, will
result in a stat call for each file in the directory, even though linux had
just got a stat entry for every file while it was resolving directory names.
On top of that, Linux will serialize all I/O with the server, so there’s no
concurrent requests for file information, writes, or reads pending at the same
time to the server; and read and write throughput will degrade as latency
increases due to increasing round-trip time, even though there are offsets
included in the read and write calls. It works well enough, but is
frustrating to run up against, since there’s not a lot you can do server-side
to help with this beyond implementing the 9P2000.L variant (which, maybe is
worth it).
The Ugly
Unfortunately, we don’t know the file size(s) until we’ve actually opened the
underlying tar file and found the correct member, so for most files, we don’t
know the real size to report when getting a stat. We can’t parse the tarfiles
for every stat call, since that’d make ls even slower (bummer). Only
hiccup is that when I report a filesize of zero, gdb throws a bit of a
fit; let’s try with a size of 0 to start:
$ ls -lah /usr/lib/debug/.build-id/e5/9f81f6573dadd5d95a6e4474d9388ab2777e2a.debug
-r--r--r-- 1 root root 0 Dec 31 1969 /usr/lib/debug/.build-id/e5/9f81f6573dadd5d95a6e4474d9388ab2777e2a.debug
$ gdb -q /usr/sbin/netlabelctl
Reading symbols from /usr/sbin/netlabelctl...
Reading symbols from /usr/lib/debug/.build-id/e5/9f81f6573dadd5d95a6e4474d9388ab2777e2a.debug...
warning: Discarding section .note.gnu.build-id which has a section size (24) larger than the file size [in module /usr/lib/debug/.build-id/e5/9f81f6573dadd5d95a6e4474d9388ab2777e2a.debug]
[...]
This obviously won’t work since gdb will throw away all our hard work because
of stat’s output, and neither will loading the real size of the underlying
file. That only leaves us with hardcoding a file size and hope nothing else
breaks significantly as a result. Let’s try it again:
$ ls -lah /usr/lib/debug/.build-id/e5/9f81f6573dadd5d95a6e4474d9388ab2777e2a.debug
-r--r--r-- 1 root root 954M Dec 31 1969 /usr/lib/debug/.build-id/e5/9f81f6573dadd5d95a6e4474d9388ab2777e2a.debug
$ gdb -q /usr/sbin/netlabelctl
Reading symbols from /usr/sbin/netlabelctl...
Reading symbols from /usr/lib/debug/.build-id/e5/9f81f6573dadd5d95a6e4474d9388ab2777e2a.debug...
(gdb)
Much better. I mean, terrible but better. Better for now, anyway.
Kilroy was here
Do I think this is a particularly good idea? I mean; kinda. I’m probably going
to make some fun 9parigato-based filesystems for use around my LAN, but I
don’t think I’ll be moving to use debugfs until I can figure out how to
ensure the connection is more resilient to changing networks, server restarts
and fixes on i/o performance. I think it was a useful exercise and is a pretty
great hack, but I don’t think this’ll be shipping anywhere anytime soon.
Along with me publishing this post, I’ve pushed up all my repos; so you
should be able to play along at home! There’s a lot more work to be done
on arigato; but it does handshake and successfully export a working
9P2000.u filesystem. Check it out on on my github at
arigato,
debugfs
and also on crates.io
and docs.rs.
At least I can say I was here and I got it working after all these years.
It has been a very busy couple of weeks as we worked against some major transitions and a security fix that required a rebuild of the $world. I am happy to report that against all odds we have a beta release! You can read all about it here: https://kubuntu.org/news/kubuntu-24-04-beta-released/ Post beta freeze I have already begun pushing our fixes for known issues today. A big one being our new branding! Very exciting times in the Kubuntu world.
In the snap world I will be using my free time to start knocking out KDE applications ( not covered by the project ). I have also recruited some help, so you should start seeing these pop up in the edge channel very soon!
Now that we are nearing the release of Noble Numbat, my contract is coming to an end with Kubuntu. If you would like to see Plasma 6 in the next release and in a PPA for Noble, please consider donating to extend my contract at https://kubuntu.org/donate !
Test Kubuntu 24.04 Beta and Experience Innovation with KubuQA!
We’re thrilled to announce the availability of the Kubuntu 24.04 Beta! This release is packed with new features and enhancements, and we’re inviting you, our valued community, to join us in fine-tuning this exciting new version. Whether you’re a seasoned tester or new to software testing, your feedback is crucial to making Kubuntu 24.04 the best it can be.
To make your testing journey as easy as pie, we’re introducing a fantastic new tool: KubuQA. Designed with both new and experienced users in mind, KubuQA simplifies the testing process by automating the download, VirtualBox setup, and configuration steps. Now, everyone can participate in testing Kubuntu with ease!
This beta release also debuts our fresh new branding, artwork, and wallpapers—created and chosen by our own community through recent branding and wallpaper contests. These additions reflect the spirit and creativity of the Kubuntu family, and we can’t wait for you to see them.
Get Testing
By participating in the beta testing of Kubuntu 24.04, you’re not just helping improve the software; you’re becoming an integral part of a global community that values open collaboration and innovation. Your contributions help us identify and fix issues, ensuring Kubuntu remains a high-quality, stable, and user-friendly Linux distribution.
The benefits of joining our testing team extend beyond improving the software. You’ll gain valuable experience, meet like-minded individuals, and perhaps discover a new passion in the world of open-source software.
So why wait? Download the Kubuntu 24.04 Beta today, try out KubuQA, or follow our wiki to upgrade and help us make Kubuntu better than ever! Remember, your feedback is the key to our success.
Ready to make an impact?
Join us in this exciting phase of development and see your ideas come to life in Kubuntu. Plus, enjoy the satisfaction of knowing that you’ve contributed to a project used by millions around the world. Become a tester today and be part of something big!
Interested in more than testing?
By the way, have you thought about becoming a member of the Kubuntu Community? It’s a fantastic way to contribute more actively and help shape the future of Kubuntu. Learn more about joining the community.
The Ubuntu Studio team is pleased to announce the beta release of Ubuntu Studio 24.04 LTS, codenamed “Noble Numbat”.
While this beta is reasonably free of any showstopper installer bugs, you will find some bugs within. This image is, however, mostly representative of what you will find when Ubuntu Studio 24.04 is released on April 25, 2024.
Special Notes
The Ubuntu Studio 24.04 LTS disk image (ISO) exceeds 4 GB and cannot be downloaded to some file systems such as FAT32 and may not be readable when burned to a DVD. For this reason, we recommend downloading to a compatible file system. When creating a boot medium, we recommend creating a bootable USB stick with the ISO image or burning to a Dual-Layer DVD.
Full updated information, including Upgrade Instructions, are available in the Release Notes.
Please note that upgrading before the release of 24.04.1,due August 2024, is unsupported.
New Features This Release
PipeWire continues to improve with every release and is so robust it can be used for professional and prosumer use. Version 1.0.4
Ubuntu Studio Installer‘s included Ubuntu Studio Audio Configurationutility for fine-tuning the PipeWire setup or changing the configuration altogether now includes the ability to create or remove a dummy audio device. Version 1.9
Major Package Upgrades
Ardour version 8.4.0
Qtractor version 0.9.39
OBS Studio version 30.0.2
Audacity version 3.4.2
digiKam version 8.2.0
Kdenlive version 23.08.5
Krita version 5.2.2
There are many other improvements, too numerous to list here. We encourage you to look around the freely-downloadable ISO image.
Known Issues
Ubuntu Studio’s classic PulseAudio-JACK configuration cannot be used on Ubuntu Desktop (GNOME) due to a known issue with the ubuntu-desktop metapackage. (LP: #2033440)
We now discourage the use of the aforementioned classic PulseAudio-JACK configuration as PulseAudio is becoming deprecated with time in favor of PipeWire. PipeWire’s JACK configuration can be disabled to use JACK2 via QJackCTL for advanced users.
Due to the Ubuntu repositories being in-flux following the time_t transition and xz-utils security issue resolution, some items in the repository are uninstallable or causing other packaging conflicts. The Ubuntu Release Team is working around the clock to help resolve these issues, so patience is required.
Additionally, we need financial contributions. Our project lead, Erich Eickmeyer, is working long hours on this project and trying to generate a part-time income. See this post as to the reasons why and go here to see how you can contribute financially (options are also in the sidebar).
Frequently Asked Questions
Q: Does Ubuntu Studio contain snaps? A: Yes. Mozilla’s distribution agreement with Canonical changed, and Ubuntu was forced to no longer distribute Firefox in a native .deb package. We have found that, after numerous improvements, Firefox now performs just as well as the native .deb package did.
Thunderbird has become a snap this cycle in order for the maintainers to get security patches delivered faster.
Additionally, Freeshow is an Electron-based application. Electron-based applications cannot be packaged in the Ubuntu repositories in that they cannot be packaged in a traditional Debian source package. While such apps do have a build system to create a .deb binary package, it circumvents the source package build system in Launchpad, which is required when packaging for Ubuntu. However, Electron apps also have a facility for creating snaps, which can be uploaded and included. Therefore, for Freeshow to be included in Ubuntu Studio, it had to be packaged as a snap.
Q: If I install this Beta release, will I have to reinstall when the final release comes out? A: No. If you keep it updated, your installation will automatically become the final release. However, if Audacity returns to the Ubuntu repositories before final release, then you might end-up with a double-installation of Audacity. Removal instructions of one or the other will be made available in a future post.
Q: Will you make an ISO with {my favorite desktop environment}? A: To do so would require creating an entirely new flavor of Ubuntu, which would require going through the Official Ubuntu Flavor application process. Since we’re completely volunteer-run, we don’t have the time or resources to do this. Instead, we recommend you download the official flavor for the desktop environment of your choice and use Ubuntu Studio Installer to get Ubuntu Studio – which does *not* convert that flavor to Ubuntu Studio but adds its benefits.
Q: What if I don’t want all these packages installed on my machine? A: Simply use the Ubuntu Studio Installer to remove the features of Ubuntu Studio you don’t want or need!
We are happy to announce the Beta release for Lubuntu Noble (what will become 24.04 LTS)! What makes this cycle unique? Lubuntu is a lightweight flavor of Ubuntu, based on LXQt and built for you. As an official flavor, we benefit from Canonical’s infrastructure and assistance, in addition to the support and enthusiasm from the […]
And it’s finally out, our first LTS (Long Term Support) release of Incus!
For anyone unfamiliar, Incus is a modern system container and virtual machine manager developed and maintained by the same team that first created LXD. It’s released under the Apache 2.0 license and is run as a community led Open Source project as part of the Linux Containers organization.
Incus provides a cloud-like environment, creating instances from premade images and offers a wide variety of features, including the ability to seamlessly cluster up to 50 servers together.
It supports multiple different local or remote storage options, traditional or fully distributed networking and offers most common cloud features, including a full REST API and integrations with common tooling like Ansible, Terraform/OpenTofu and more!
The LTS release of Incus will be supported until June 2029 with the first two years featuring bug and security fixes as well as minor usability improvements before transitioning to security fixes only for the remaining 3 years.
The highlights for existing Incus users are:
Swap limits for containers
New shell completion mechanism
Creation of external bridge interfaces
Live-migration of VMs with disks attached
System information in incus info --resources
USB information in incus info --resources
For those coming from LXD 5.0 LTS, a full list of changes is included in the announcement as well as some instructions on how to migrate over.
The full announcement and changelog can be found here. And for those who prefer videos, here’s the release overview video:
And as always, my company is offering commercial support on Incus, ranging from by-the-hour support contracts to one-off services on things like initial migration from LXD, review of your deployment to squeeze the most out of Incus or even feature sponsorship. You’ll find all details of that here: https://zabbly.com/incus
Donations towards my work on this and other open source projects is also always appreciated, you can find me on Github Sponsors, Patreon and Ko-fi.
New “netplan status –diff” subcommand, finding differences between configuration and system state
As the maintainer and lead developer for Netplan, I’m proud to announce the general availability of Netplan v1.0 after more than 7 years of development efforts. Over the years, we’ve so far had about 80 individual contributors from around the globe. This includes many contributions from our Netplan core-team at Canonical, but also from other big corporations such as Microsoft or Deutsche Telekom. Those contributions, along with the many we receive from our community of individual contributors, solidify Netplan as a healthy and trusted open source project. In an effort to make Netplan even more dependable, we started shipping upstream patch releases, such as 0.106.1 and 0.107.1, which make it easier to integrate fixes into our users’ custom workflows.
With the release of version 1.0 we primarily focused on stability. However, being a major version upgrade, it allowed us to drop some long-standing legacy code from the libnetplan1 library. Removing this technical debt increases the maintainability of Netplan’s codebase going forward. The upcoming Ubuntu 24.04 LTS and Debian 13 releases will ship Netplan v1.0 to millions of users worldwide.
Highlights of version 1.0
In addition to stability and maintainability improvements, it’s worth looking at some of the new features that were included in the latest release:
Simultaneous WPA2 & WPA3 support.
Introduction of a stable libnetplan1 API.
Mellanox VF-LAG support for high performance SR-IOV networking.
New hairpin and port-mac-learning settings, useful for VXLAN tunnels with FRRouting.
New netplan status –diff subcommand, finding differences between configuration and system state.
Besides those highlights of the v1.0 release, I’d also like to shed some light on new functionality that was integrated within the past two years for those upgrading from the previous Ubuntu 22.04 LTS which used Netplan v0.104:
We added support for the management of new network interface types, such as veth, dummy, VXLAN, VRF or InfiniBand (IPoIB).
Wireless functionality was improved by integrating Netplan with NetworkManager on desktop systems, adding support for WPA3 and adding the notion of a regulatory-domain, to choose proper frequencies for specific regions.
To improve maintainability, we moved to Meson as Netplan’s buildsystem, added upstream CI coverage for multiple Linux distributions and integrations (such as Debian testing, NetworkManager, snapd or cloud-init), checks for ABI compatibility, and automatic memory leak detection.
We increased consistency between the supported backend renderers (systemd-networkd and NetworkManager), by matching physical network interfaces on permanent MAC address, when the match.macaddress setting is being used, and added new hardware offloading functionality for high performance networking, such as Single-Root IO Virtualisation virtual function link-aggregation (SR-IOV VF-LAG).
The much improved Netplan documentation, that is now hosted on “Read the Docs”, and new command line subcommands, such as netplan status, make Netplan a well vested tool for declarative network management and troubleshooting.
Integrations
Those changes pave the way to integrate Netplan in 3rd party projects, such as system installers or cloud deployment methods. By shipping the new python3-netplan Python bindings to libnetplan, it is now easier than ever to access Netplan functionality and network validation from other projects. We are proud that the Debian Cloud Team chose Netplan to be the default network management tool in their official cloud-images for Debian Bookworm and beyond. Ubuntu’s NetworkManager package now uses Netplan as it’s default backend on Ubuntu 23.10 Desktop systems and beyond. Further integrations happened with cloud-init and the Calamares installer.
Typically you would use the incus command-line interface (CLI) client to get access to the Incus manager and perform the tasks for the full life-cycle of the virtual machines and system containers.
In this post we see how to install and setup the Incus Web UI. Just like the incus CLI tool that gets access to the REST API of the Incus manager (through a Unix socket or HTTPS), the Incus Web UI does the same over HTTPS. I assume that you have already installed and setup Incus.
The Incus Web UI package is incus-ui-canonical. We install it. By installing the package, we can enable Incus to serve the necessary Web pages (from /opt/incus/ui) so that we can connect with our browser and manage Incus itself.
debian@myincus:~$ incus config show
config: {}
debian@myincus:~$
We activate the Incus Web server, selecting the port number 8443. You are free to select another one, if you need to. We set core.https_address to :8443. This information appears in the incus config output.
debian@myincus:~$ incus config set core.https_address :8443
debian@myincus:~$ incus config show
config:
  core.https_address: :8443
debian@myincus:~$
Let’s verify that Incus is now listening to port 8443. Yes, it does. On all interfaces (because of the *).
This is HTTPS, where are the certificate and the server key (private key)?
debian@myincus:~$ sudo ls -l /var/lib/incus/server.key /var/lib/incus/server.crt
-rw-r--r-- 1 root root 753 Mar 28 18:54 /var/lib/incus/server.crt
-rw------- 1 root root 288 Mar 28 18:54 /var/lib/incus/server.key
debian@myincus:~$ sudo openssl x509 -in /var/lib/incus/server.crt -text -noout
Certificate:
    Data:
        Version: 3 (0x2)
        Serial Number:
            22:05:f1:14:f2:82:43:68:44:5e:1c:42:4c:28:5b:5c
        Signature Algorithm: ecdsa-with-SHA384
        Issuer: O = Linux Containers, CN = root@myincus
        Validity
            Not Before: Mar 28 18:54:17 2024 GMT
            Not After : Mar 26 18:54:17 2034 GMT
        Subject: O = Linux Containers, CN = root@myincus
        Subject Public Key Info:
            Public Key Algorithm: id-ecPublicKey
                Public-Key: (384 bit)
                pub:
                    04:fb:cd:b6:b2:25:55:68:a5:33:75:48:4c:b0:7a:
                    2f:e9:c0:16:af:6f:b2:36:f9:19:6e:b0:86:bf:d1:
                    9f:07:16:b1:26:8b:75:36:f2:fc:02:38:c7:fa:25:
                    39:01:6c:bb:48:a9:4f:57:0d:af:e1:0f:a3:cf:b1:
                    7c:a2:d9:46:77:e7:94:c7:00:1a:d0:5f:5f:93:d8:
                    11:39:8d:16:0e:d0:62:98:81:93:da:ec:b8:70:24:
                    f2:c4:da:91:0f:f8:8e
                ASN1 OID: secp384r1
                NIST CURVE: P-384
        X509v3 extensions:
            X509v3 Key Usage: critical
                Digital Signature, Key Encipherment
            X509v3 Extended Key Usage:
                TLS Web Server Authentication
            X509v3 Basic Constraints: critical
                CA:FALSE
            X509v3 Subject Alternative Name:
                DNS:myincus, IP Address:127.0.0.1, IP Address:0:0:0:0:0:0:0:1
    Signature Algorithm: ecdsa-with-SHA384
    Signature Value:
        30:64:02:30:15:f4:fa:7b:d6:52:79:d4:c9:27:b9:d6:6c:90:
        f7:0e:13:83:15:ac:af:cd:c5:f2:48:08:99:7f:7b:94:55:06:
        81:95:80:5f:0a:21:17:82:61:ac:5a:b6:5f:b8:49:b3:02:30:
        62:a3:92:66:da:ce:7c:01:49:7e:38:16:c6:16:b3:cb:aa:3d:
        1d:3f:63:12:93:e8:a1:0b:55:f0:80:99:d5:80:8a:a3:a6:2e:
        3d:68:90:a6:dc:55:29:0b:36:80:36:72

debian@myincus:~$
Note that this is a self-signed certificate. Chrome, Firefox and other browsers will complain; you can still accept to continue but it will show a broken padlock at the address bar. If you wish, you can replace these with proper certificates so that the padlock is intact. To do so, once you replace the server key and the server certificate with actual values, restart Incus. If, however, you are running an Incus cluster, you must use lxc cluster update-certificate instead to update them. Note that a common alternative to dealing with Incus certificates, is to use a reverse-proxy; you get the reverse-proxy to use a proper certificate and leave Incus as is.
At this point Incus is configured. We can continue with the next step where we get the client (our browser) to be authenticated to the server.
Getting the browser to authenticate to the server
Visit the URL of your Incus server with your browser. At first you will likely confronted with a message that the server certificate is not accepted (Warning: Potential Security Risk Ahead). Click to Accept and continue. Then, you are presented with the following screen that asks you to login. You are authenticated to the Incus server through user certificates. You are prompted here to do just that. Your browser will create
a user certificate to be installed into Incus (incus-ui.crt)
the same user certificate with a private key that will be setup in your browser(s) (incus-ui.pfx).
Click on Create a new certificate.
Creating a new certificate.
Now click on Generate to get your browser to generate the private key and the certificate.
You are asked whether you want to protect the certificate with a password. In our case we click on Skip because we do not want to encrypt the private key with a password. By clicking on Skip, the private key is still generated but it is not getting encrypted.
At this point the browser generated incus-ui.crt, which is the user certificate to install in Incus. In the following we added the user certificate to Incus.
debian@myincus:~$ incus config trust list
+------+------+-------------+-------------+-------------+
| NAME | TYPE | DESCRIPTION | FINGERPRINT | EXPIRY DATE |
+------+------+-------------+-------------+-------------+
debian@myincus:~$ incus config trust add-certificate incus-ui.crt
debian@myincus:~$ incus config trust list
+--------------+--------+-------------+--------------+----------------------+
|     NAME     |  TYPE  | DESCRIPTION | FINGERPRINT  |     EXPIRY DATE      |
+--------------+--------+-------------+--------------+----------------------+
| incus-ui.crt | client |             | b89b80eb4c89 | 2026/12/23 21:08 UTC |
+--------------+--------+-------------+--------------+----------------------+
debian@myincus:~$
The two files have been generated. We are adding incus-ui.crt to Incus, and incus-ui.pfx to the Web browser.
The page above has instructions on how to add the user certificate to Firefox, Chrome, Edge and macOS. For example, for the case of Firefox, type the following to the address bar and press Enter. Alternatively, go to Settings→Privacy & Security→Certificates. There, click on View Certificates… and select the Your Certificates tab. Finally, click to Import… the incus-ui.pfx certificate file.
about:preferences#privacy
This is found in Firefox under Settings→Privacy & Security→Certificates.
When you add the incus-ui.pfx user certificate in Firefox, it will appear as in the following screenshot.
The incus-ui.pfx certificate has been added to this instance of Firefox.
Subsequently, switch back to the Firefox tab with the Incus UI page and you are shown the following prompt to get your browser to send the user certificate to the Incus manager in order to get authenticated, and be able to manage Incus through the Web. Click on OK.
You are prompted to identify yourself to Incus UI in order to be able to manage the Incus installation.
Finally, you are able to manage Incus over the Web with Incus UI. The Web page loads up and you can perform all tasks that you can do with the incus command-line client.
Your browser is now authenticated through your user certificate and you can manage Incus over the Web with Incus UI.
Using the Incus UI
We click on Create Instance to create a first instance. We select from the list which image to use, then click to Create and start.
Creating an instance and starting it.
While the instance is created, you are updated with the different steps that take place. In the end, the instance is successfully launched.
The instance has been created and is running.
Conclusion
With Incus UI you are able to go through all the workflow of managing Incus instances through your Web browser. Incus UI has been implemented as a stateless Web application, which means that no information are stored on the browser. For example, the browser does not maintain a database with the created instances; the state is maintained on Incus.
There are a few more UI Web applications for Incus, including lxops. At some point in the future I expect to cover them as well.
Tips and Tricks
How to make the Incus port accessible to localhost only
The address has the format of <ip address>:<port>. You can specify localhost (127.0.0.1) for the part of the IP address. By doing so, Incus will only bind to localhost and listen to local connections only.
debian@myincus:~$ incus config show
config:
  core.https_address: :8443
debian@myincus:~$ incus config set core.https_address 127.0.0.1:8443
debian@myincus:~$ incus config show
config:
  core.https_address: 127.0.0.1:8443
debian@myincus:~$ sudo lsof -i :8443
COMMAND  PID USER   FD   TYPE DEVICE SIZE/OFF NODE NAME
incusd  8338 root    8u  IPv4  30315      0t0  TCP localhost:8443 (LISTEN)
debian@myincus:~$
What’s in incus-ui.crt and incus-ui.pfx?
You can use openssl to decode both files. This is an RSA 2048-bit certificate using the SHA-1 hash function.
$ openssl x509 -in incus-ui.crt -noout -text
Certificate:
    Data:
        Version: 3 (0x2)
        Serial Number:
            01:12:00:11:07:65:00:03:00:10:00:41:00:04:09:11
        Signature Algorithm: sha1WithRSAEncryption
        Issuer: C = AU, ST = Some-State, O = Incus UI 10.10.10.98 (Browser Generated)
        Validity
            Not Before: Mar 28 21:08:58 2024 GMT
            Not After : Dec 23 21:08:58 2026 GMT
        Subject: C = AU, ST = Some-State, O = Incus UI 10.10.10.98 (Browser Generated)
        Subject Public Key Info:
            Public Key Algorithm: rsaEncryption
                Public-Key: (2048 bit)
                Modulus:
                    00:ce:f8:1d:67:e1:a3:f5:1a:16:b6:26:63:8f:32:
                    42:99:0d:af:86:8b:18:49:1a:4b:8e:ab:68:e1:04:
                    ba:24:dd:e6:27:d5:df:7a:13:cf:16:b3:33:28:89:
                    e0:ab:c8:dc:c1:2a:0a:de:ed:26:3a:77:74:dd:42:
                    1c:e2:22:fc:a5:a5:68:c1:c9:3b:4d:12:15:27:ae:
                    c6:50:ec:dc:f1:0a:ba:00:0c:83:d0:0d:0f:81:90:
                    4e:30:43:cb:45:bf:e2:e9:17:39:40:3b:95:8b:8b:
                    18:e9:59:51:fc:9a:7a:80:e4:73:b3:54:bd:ff:1c:
                    7c:81:75:16:e3:6f:3a:56:9b:0f:a3:73:55:45:03:
                    d8:fb:f3:34:4c:60:4f:f2:67:9f:66:ea:29:29:78:
                    6c:66:05:d6:7d:96:cd:0f:2b:4b:9c:71:2c:09:6f:
                    e2:b4:23:d0:5d:d0:fe:b0:6a:b1:58:5e:d7:b5:47:
                    9e:aa:47:34:f8:7d:e1:ed:fe:bf:97:3d:99:49:42:
                    af:e2:e5:b3:c5:1e:58:b1:98:01:db:8f:25:9f:f8:
                    d9:03:02:06:f9:99:0a:3a:a1:70:9d:fe:64:0d:c2:
                    d8:cc:f0:1c:53:e4:31:4c:78:12:c2:fd:72:23:6a:
                    f4:7e:41:f9:d5:df:6b:ad:2c:52:29:d0:7f:eb:65:
                    64:0f
                Exponent: 65537 (0x10001)
    Signature Algorithm: sha1WithRSAEncryption
    Signature Value:
        28:b3:5c:48:64:8c:23:82:dd:e2:05:6a:9d:18:dd:43:f4:07:
        e6:be:1e:80:b7:f9:0c:0f:3d:cd:b8:bd:7b:55:7e:36:6d:74:
        24:d5:69:b2:24:51:3a:2d:c5:95:68:b5:dc:27:d5:83:d9:bc:
        cb:d0:fd:55:24:63:7d:c6:65:9b:f1:b3:9d:f7:b4:4e:ba:83:
        eb:bf:f5:d0:f6:95:2d:7b:90:4e:d3:89:ac:f0:87:e6:fa:9d:
        f6:ea:c2:42:f2:15:17:74:5c:e4:3c:ed:1a:42:3c:e7:04:aa:
        65:42:3e:75:5c:24:8e:52:85:0d:4b:b2:e2:ec:fa:57:4a:68:
        35:4b:8f:3c:13:fc:15:09:80:5a:b1:c8:e0:22:f5:69:25:4b:
        46:8b:e0:b9:e1:3a:f5:0c:40:d2:c3:75:9c:79:9a:aa:68:9b:
        21:36:ed:67:cb:6d:fc:bc:f0:0b:5a:2b:1a:4c:73:67:c5:79:
        b6:27:b9:58:d0:c7:ea:84:21:bf:f4:7c:44:11:d7:88:ab:1d:
        e4:53:c9:10:cd:e6:b8:5a:7a:92:73:a8:1e:fe:1c:2e:dc:e8:
        7e:3d:e9:a2:6d:26:5a:09:40:a1:3e:51:40:8b:da:57:37:9a:
        8d:0e:d8:cf:c1:0a:b1:0b:95:53:05:41:29:39:af:93:9b:aa:
        10:af:a1:6c
$
For the incus-ui.pfx file, we first convert to the PEM format, then print the contents. The PFX file contains the certificate (the same that was added earlier to Incus) along with the private key.
You tried to access the IP address of the Incus server as (for example) https://192.168.1.10/ while you should have specified the IP address as well. The URL should look like https://192.168.1.10:8443/.
Error: Client sent an HTTP request to an HTTPS server
You tried to connect to the Incus server at an address (for example) http://192.168.1.10:8443/ but you omitted the s in https. Use https://192.168.1.10:8443/ instead.
Warning: Potential Security Risk Ahead
You are accessing the Incus server through the HTTPS address for the first time and the certificate has not been signed by a certification authority.
First attempt to access the Incus server over HTTPS with your browser.
Click on Advanced and select to Accept the risk and Continue. If you want to avoid this error message, you need to provide a server certificate that is accepted by your browser.
As many of you know, I lost my beloved son March 9th. This has hit me really hard, but I am staying strong and holding on to all the wonderful memories I have. He grew up to be an amazing man, devoted christian and wonderful father. He was loved by everyone who knew him and will be truly missed by us all. I have had folks ask me how they can help. He left behind his 7 year old son Mason. Mason was Billy’s world and I would like to make sure Mason is taken care of. I have set up a gofundme for Mason and all proceeds will go to the future care of him.
You will see the activity in this ramp back up as the KDEneon Core project is finally a go! I will participate in the project with part time status and get everyone in the Enokia team up to speed with my snap knowledge, help prepare the qt6/kf6 transition, package plasma, and most importantly I will focus on documentation for future contributors.
I have created the ( now split ) qt6 with KDE patchset support and KDE frameworks 6 SDK and runtime snaps. I have made the kde-neon-6 extension and the PR is in: https://github.com/canonical/snapcraft/pull/4698 . Future work on the extension will include multiple versions track support and core24 support.
I have successfully created our first qt6/kf6 snap ark. They will show showing up in the store once all the required bits have been merged and published.
A virtual machine (VM) is an instance of an operating system that runs on a computer, along with the main operating system. A virtual machine uses hardware virtualization features for the separation from the main operating system. With virtual machines, the full operating system boots up in them.
A system container is an instance of an operating system that also runs on a computer, along with the main operating system. A system container, instead, uses security primitives of the Linux kernel for the separation from the main operating system. You can think of system containers as software virtual machines. System containers reuse the running Linux kernel of the host, therefore you can only have Linux system containers, any Linux distribution.
In this post we see how to create a VM with Incus, install Incus into that VM, and then create a VM through the inner Incus installation. This is also called nested virtualization. Incus works fine with nested virtualization. Any pitfalls arise from the settings of the host (BIOS/UEFI settings, host Linux kernel, etc). We’ll see these together, step by step.
You would need to enter into the BIOS/UEFI settings and enable the option for VT-x (for Intel CPUs) or AMD-V (for AMD CPUs) virtualization. If you are unsure, you can just follow the instructions in the next step which will complain if you have not enabled the appropriate BIOS/UEFI settings.
As a sidenote there is another setting, Intel VT-d (for Intel CPUs) or AMD-Vi (for AMD CPUs) that allow to move a supported hardware device (like a GPU, if you have more than one) into the VM. Not essential for what we are testing, but keep that in mind if you get too deep into virtualization.
There are also some additional options that are optional, AMD Nested Page tables (NPT) (for AMD) and Rapid Virtualization Indexing (RVI)/Intel Extended Page Tables (EPT) for Intel. These help for performance.
Testing your host for virtualization
The Linux kernel that is available in most Linux distributions supports the KVM hypervisor for virtualization.
Applications use the libvirttoolkit to access the virtualization features.
In order to test if our host supports virtualization, we install cpu-checker and the libvirt-clients packages on the host and then run kvm-ok and virt-host-validate respectively to verify our system. Compared between the two utilities, the latter is better. However, I am including cpu-checkeras it is covered in lots of documentation.
$ sudo apt install -y cpu-checker libvirt-clients
...
$ kvm-ok
INFO: /dev/kvm exists
KVM acceleration can be used
$ sudo virt-host-validate
  QEMU: Checking for hardware virtualization                                 : PASS
  QEMU: Checking if device /dev/kvm exists                                   : PASS
  QEMU: Checking if device /dev/kvm is accessible                            : PASS
  QEMU: Checking if device /dev/vhost-net exists                             : PASS
  QEMU: Checking if device /dev/net/tun exists                               : PASS
  QEMU: Checking for cgroup 'cpu' controller support                         : PASS
  QEMU: Checking for cgroup 'cpuacct' controller support                     : PASS
  QEMU: Checking for cgroup 'cpuset' controller support                      : PASS
  QEMU: Checking for cgroup 'memory' controller support                      : PASS
  QEMU: Checking for cgroup 'devices' controller support                     : PASS
  QEMU: Checking for cgroup 'blkio' controller support                       : PASS
  QEMU: Checking for device assignment IOMMU support                         : PASS
  QEMU: Checking if IOMMU is enabled by kernel                               : PASS
  QEMU: Checking for secure guest support                                    : WARN (Unknown if this platform has Secure Guest support)
   LXC: Checking for Linux >= 2.6.26                                         : PASS
   LXC: Checking for namespace ipc                                           : PASS
   LXC: Checking for namespace mnt                                           : PASS
   LXC: Checking for namespace pid                                           : PASS
   LXC: Checking for namespace uts                                           : PASS
   LXC: Checking for namespace net                                           : PASS
   LXC: Checking for namespace user                                          : PASS
   LXC: Checking for cgroup 'cpu' controller support                         : PASS
   LXC: Checking for cgroup 'cpuacct' controller support                     : PASS
   LXC: Checking for cgroup 'cpuset' controller support                      : PASS
   LXC: Checking for cgroup 'memory' controller support                      : PASS
   LXC: Checking for cgroup 'devices' controller support                     : PASS
   LXC: Checking for cgroup 'freezer' controller support                     : FAIL (Enable 'freezer' in kernel Kconfig file or mount/enable cgroup controller in your system)
   LXC: Checking for cgroup 'blkio' controller support                       : PASS
   LXC: Checking if device /sys/fs/fuse/connections exists                   : PASS
$
If you get a failure, try to identify whether the issue is with your computer’s firmware or with the Linux kernel of your host. If in doubt, post below the output.
Why does the output mention both QEMU and LXC? By default, the command shows all libvirt virtualization support, unless you specify something specific. If you wanted only the QEMU output, you would run sudo virt-host-validate qemu. Note that the LXC here is not the Linux Containers LXC. The LXC above is the Libvirt LXC.
Testing your host for nested virtualization
I have not noticed any mention for nested virtualization in the output of virt-host-validate. If you know a tool that shows that information, write it in the comments. In the absence of such a tool, let’s check manually.
If you have an AMD CPU, run the following. If you get 1, then nested virtualization through KVM works.
$ cat /sys/module/kvm_amd/parameters/nested
1
$
If instead you have an Intel CPU, run the following. If you get Y(instead of 1), then nested virtualization through KVM works.
$ cat /sys/module/kvm_intel/parameters/nested
Y
$
If instead you get an error (such as the following), then something is wrong. Report back your CPU model and motherboard, along with the Linux kernel version and Linux distribution.
cat: /sys/module/kvm_intel/parameters/nested: No such file or directory
Launching the outer Incus VM
We launch the outer VM. Get a shell into the outer VM, install Incus and those utilities that show whether KVM virtualization works. Then, we launch an Alpine VM in the outer VM. We get an error regarding Secure Boot (the Alpine Linux kernel is not signed), remove the stuck VM and launch again with Secure Boot disabled. Finally, we get a shell into the inner VM.
$ incus launch images:debian/12 outervm --vm
Launching outervm
$ incus shell outervm
root@outervm:~#

      # Install Incus according to the documentation.

root@outervm:~# sudo apt install -y cpu-checker libvirt-clients
...
root@outervm:~# virt-host-validate
  QEMU: Checking for hardware virtualization                                 : PASS
  QEMU: Checking if device /dev/kvm exists                                   : PASS
  QEMU: Checking if device /dev/kvm is accessible                            : PASS
  QEMU: Checking if device /dev/vhost-net exists                             : PASS
  QEMU: Checking if device /dev/net/tun exists                               : PASS
...
root@outervm:~# incus launch images:alpine/edge innervm --vm
Launching innervm
Error: Failed instance creation: The image used by this instance is incompatible with secureboot. Please set security.secureboot=false on the instance
root@outervm:~# incus delete innervm
root@outervm:~# incus launch images:alpine/edge innervm --vm --config security.secureboot=false
Launching innervm
root@outervm:~# incus list -c ns4t
+---------+---------+-----------------------+-----------------+
|  NAME   |  STATE  |         IPV4          |      TYPE       |
+---------+---------+-----------------------+-----------------+
| innervm | RUNNING | 10.227.169.165 (eth0) | VIRTUAL-MACHINE |
+---------+---------+-----------------------+-----------------+
root@outervm:~# uname -a
Linux outervm 6.1.0-18-amd64 #1 SMP PREEMPT_DYNAMIC Debian 6.1.76-1 (2024-02-01) x86_64 GNU/Linux
root@outervm:~# incus shell innervm
innervm:~# uname -a
Linux innervm 6.6.22-1-virt #2-Alpine SMP PREEMPT_DYNAMIC Thu, 14 Mar 2024 02:12:52 +0000 x86_64 Linux
innervm:~#
Conclusion
We saw how to verify whether our host is able to work with hardware virtualization. This involves checking both the computer firmware settings (BIOS/UEFI) and the host Linux kernel.
Then, we created an outer VM with Incus, got a shell into there, installed Incus, and launched an inner (nested) VM.
I wonder whether we can go further and create a VM inside the inner VM. If you go through these and try to create an inner inner VM, post the error message. It does not feel like it should be possible.
I’ve recently switched back from vscode to Sublime Text, which means that after all the time I spent training my fingers to type “code somefile.txt” instead of “subl somefile.txt” I now need to undo all that conditioning and go back to subl again. So I thought, hey, maybe I should dump a little shell script called code in my bin folder which admonished me in some amusing way, thus Pavlov-ing myself into learning to do it right.
And then I thought, hey, what’d be cool is if I had that Matrix-esque “raining code” effect in the Terminal and then it was superimposed with a box saying “STOPTYPING code ANDUSE subl INSTEAD”, like the “SYSTEMERROR” message at the end of the first movie.
And then I thought: someone’s already done this, right? And they have; it is called cmatrix. But I don’t like cmatrix because it doesn’t do the colours right; the text just sorta stops rather than fading away like the movie does, and it feels unreal and too sharp for me. Now, don’t get me wrong, I understand why this is; terminals support a full proper range of colour these days, but writing a program which gets released to actual people and which can deal with the bewildering array of terminal settings out there is a miserable waste of everyone’s time. But I’m not writing this for anyone else; it only has to work in my terminal (in true works on my machine fashion). And this will give me a chance to noodle about with Python terminal libraries such as blessed to make something interesting. Hence, matrix24.py:
It’s a bodge all round, and it still doesn’t look right, and Jess pointed out that making something cool happen when I make a mistake is the opposite of conditioning, but I got to fiddle about with a new library for a bit, so that was fun. Can I do something productive now?
(title from a classic post about the Matrix which still makes me laugh even after all these years, although it is very unfair to Keanu Reeves who is a cool bloke and should be emulated in his approach to life)
Multipass is pretty useful but what a pain this was to figure out, due to Ubuntu’s Node.js package not working with AWS-CDK.
Multipass lets you manage VM in Ubuntu and can take cloud-init scripts as a parameter. I wanted an Ubuntu LTS instance with AWS CDK, which needs Node.js and python3-venv.
On Mastodon, the
question came up of
how Ubuntu would deal with something like the npm install
everything situation. I replied:
Ubuntu is curated, so it probably wouldn’t get this far. If it did, then
the worst case is that it would get in the way of CI allowing other
packages to be removed (again from a curated system, so people are used to
removal not being self-service); but the release team would have no
hesitation in removing a package like this to fix that, and it certainly
wouldn’t cause this amount of angst.
If you did this in a PPA, then
I can’t think of any particular negative effects.
OK, if you added lots of build-dependencies (as well as run-time
dependencies) then you might be able to take out a builder. But Launchpad
builders already run arbitrary user-submitted code by design and are
therefore very carefully sandboxed and treated as ephemeral, so this is
hardly novel.
There’s a lot to be said for the arrangement of having a curated system for
the stuff people actually care about plus an ecosystem of add-on
repositories. PPAs cover a wide range of levels of developer activity, from
throwaway experiments to quasi-official distribution methods; there are
certainly problems that arise from it being difficult to tell the difference
between those extremes and from there being no systematic confinement, but
for this particular kind of problem they’re very nearly ideal. (Canonical
has tried various other approaches to software distribution, and while they
address some of the problems, they aren’t obviously
better at helping
people make reliable social judgements about code they don’t know.)
For a hypothetical package with a huge number of dependencies, to even try
to upload it directly to Ubuntu you’d need to be an Ubuntu developer with
upload rights (or to go via Debian, where you’d have to clear a similar
hurdle). If you have those, then the first upload has to pass manual review
by an archive administrator. If your package passes that, then it still has
to build and get through
proposed-migrationCI before it
reaches anything that humans typically care about.
On the other hand, if you were inclined to try this sort of experiment,
you’d almost certainly try it in a PPA, and that would trouble nobody but yourself.
Launchpad has been around for a while, and its frontpage has remained untouched for a few years now.
If you go into launchpad.net, you’ll notice it looks quite different from what it has looked like for the past 10 years – it has been updated! The goal was to modernize it while trying to keep it looking like Launchpad. The contents have remained the same with only a few text additions, but there were a lot of styling changes.
The most relevant change is that the frontpage now uses Vanilla components (https://vanillaframework.io/docs). This alone, not only made the layout look more modern, but also made it better for a new curious user reaching the page from a mobile device. The accessibility score of the page – calculated with Google’s Lighthouse extension – increased from a 75 to an almost perfect 98!
Given the frontpage is so often the first impression users get when they want to check out Launchpad, we started there. But in the future, we envision the rest of Launchpad looking more modern and having a more intuitive UX.
As a final note, thank you to Peter Makowski for always giving a helping hand with frontend changes in Launchpad.
Plasma Pass is a Plasma applet for the Pass password manager
This release includes build fixes for Plasma 6, due to be released later this week.
URL: https://download.kde.org/stable/plasma-pass/ Sha256: 2a726455084d7806fe78bc8aa6222a44f328b6063479f8b7afc3692e18c397ce Signed by E0A3EB202F8E57528E13E72FD7574483BB57B18D Jonathan Esk-Riddell <jr@jriddell.org> https://jriddell.org/esk-riddell.gpg
Oxygen Icons is an icon theme for use with any XDG compliant app and desktop.
It is part of KDE Frameworks 6 but is now released independently to save on resources.
This 6.0.0 release requires to be built with extra-cmake-modules from KF 6 which is not yet released, distros may want to wait until next week before building it.
Distros which ship this version can drop the version released as part of KDE Frameworks 5.
There’s a YouTube channel called
Clickspring,
run by an Australian bloke called Chris
who is a machinist: a mechanical engineer
with a lathe and a mill and all manner of
little tools. I am not a machinist — at
school I was fairly inept at what we
called CDT, for Craft Design and
Technology, and what Americans much more
prosaically call “shop class”. My dad was,
though, or an engineer at least. Although
Chris builds clocks and beautiful brass
mechanisms, and my dad built aeroplanes.
Heavy engineering. All my engineering is
software, which actual engineers don’t
think is engineering at all, and most of
the time I don’t either.
You can
romanticise it: claim that software
development isn’t craft, it’s art. And
there is a measure of truth in this. It’s
like writing, which is the other thing I
spend a lot of time doing for money;
that’s an art, too.
If you’re doing it
right, at least.
Most of the writing
that’s done, though, isn’t art. And most
of the software development isn’t, either.
Or most of the engineering. For every one
person creating beauty in prose or code or
steel, there are fifty just there doing
the job with no emotional investment in
what they’re doing at all. Honestly,
that’s probably a good thing, and not a
complaint. While I might like the
theoretical idea of a world where
everything is hand made by someone who
cares, I don’t think that you should have
to care in order to get paid. The people
who are paying you don’t care, so you
shouldn’t have to either.
It’s nice if you
can swing it so you get both, though.
The
problem is that it’s not possible to
instruct someone to give a damn. You can’t
regulate the UK government into giving a
damn about people who fled a war to come
here to find their dream of being a nurse,
you can’t regulate Apple bosses into
giving a damn about the open web, you
can’t regulate CEOs into giving a damn
about their employees or governments about
their citizens or landlords about their
tenants. That’s not what regulation is
for; people who give a damn largely don’t
need regulation because they want to do
the right thing. They might need a little
steering into knowing what the right thing
is, but that’s not the same.
No,
regulation is there as a reluctant
compromise: since you can’t make people
care, the best you can do is in some rough
and ready fashion make them behave in a
similar way to the way they would if they
did. Of course, this is why the most
insidious kind of response is not an
attempt to evade responsibility but an attack on
the system of regulation itself. Call
judges saboteurs or protesters criminals
or insurgents patriots. And why the most
heinous betrayal is one done in the name
of the very thing you’re destroying. Claim
to represent the will of the people while
hurting those people. Claim to be
defending the law while hiding violence
and murder behind a badge. Claim privacy
as a shield for surveillance or for
exclusion. We all sorta
thought
that the system could protect us, that
those with the power could be trusted to
use it at least a little responsibly. And
the last year has been one more in a
succession of years demonstrating just how
wrong that is. This and no other is the
root from which a tyrant springs; when he
first appears he is a protector.
The worst
thing about it is that the urge to protect
other people is not only real but the best
thing about ourselves. When it’s actually
real. Look after others, especially those
who need it, and look after yourself,
because you’re one of the people who needs it.
Chris from Clickspring polishes things
to a high shine using tin, which surprised
me. I thought bringing out the beauty in
something needed a soft cloth but no, it’s
done with metal. Some things, like silver,
are basically shiny with almost no effort;
there’s a reason people have prized silver
things since before we could even write
down why, and it’s not just because you
could find lumps of it lying around the
place with no need to build a smelting
furnace. Silver looks good, and makes you
look good in turn. Tin is useful, and it
helps polish other things to a high shine.
Today’s my 48th
birthday.
A highly composite number. The ways Torah
wisdom is acquired. And somewhere between
silver and tin. That sounds OK to me.
Linux kernel getting a livepatch whilst running a marathon. Generated with AI.
Livepatch service eliminates the need for unplanned maintenance windows for high and critical severity kernel vulnerabilities by patching the Linux kernel while the system runs. Originally the service launched in 2016 with just a single kernel flavour supported.
Over the years, additional kernels were added: new LTS releases, ESM kernels, Public Cloud kernels, and most recently HWE kernels too.
Recently livepatch support was expanded for FIPS compliant kernels, Public cloud FIPS compliant kernels, and as well IBM Z (mainframe) kernels. Bringing the total of kernel flavours support to over 60 distinct kernel flavours supported in parallel. The table of supported kernels in the documentation lists the supported kernel flavours ABIs, the duration of individual build's support window, supported architectures, and the Ubuntu release. This work was only possible thanks to the collaboration with the Ubuntu Certified Public Cloud team, engineers at IBM for IBM Z (s390x) support, Ubuntu Pro team, Livepatch server & client teams.
It is a great milestone, and I personally enjoy seeing the non-intrusive popup on my Ubuntu Desktop that a kernel livepatch was applied to my running system. I do enable Ubuntu Pro on my personal laptop thanks to the free Ubuntu Pro subscription for individuals.
What's next? The next frontier is supporting ARM64 kernels. The Canonical kernel team has completed the gap analysis to start supporting Livepatch Service for ARM64. Upstream Linux requires development work on the consistency model to fully support livepatch on ARM64 processors. Livepatch code changes are applied on a per-task basis, when the task is deemed safe to switch over. This safety check depends mostly on kernel stacktraces. For these checks, CONFIG_HAVE_RELIABLE_STACKTRACE needs to be available in the upstream ARM64 kernel. (see The Linux Kernel Documentation). There are preliminary patches that enable reliable stacktraces on ARM64, however these turned out to be problematic as there are lots of fix revisions that came after the initial patchset that AWS ships with 5.10. This is a call for help from any interested parties. If you have engineering resources and are interested in bringing Livepatch Service to your ARM64 platforms, please reach out to the Canonical Kernel team on the public Ubuntu Matrix, Discourse, and mailing list. If you want to chat in person, see you at FOSDEM next weekend.
Now, while hunting for bsc#1219073 which is quite sporadic, and took quite some time to show up often enough so that
became noticeable and traceable, once stars aligned and managed to find a way to get a higher failure rate,
I wanted to have a way for me and for the developer to test the kernel with the different patches to help with the bisecting
and ease the process of finding the culprit and finding a solution for it.
I came with a fairly simple solution, using the --repeat parameter of the openqa-cli tool, and a simple shell script to run it:
```bash
$ cat ~/Downloads/trigger-kernel-openqa-mdadm.sh
# the kernel repo must be the one without https; tests don't have the kernel CA installedKERNEL="KOTD_REPO=http://download.opensuse.org/repositories/Kernel:/linux-next/standard/"REPEAT="--repeat 100"# using 100 by defaultJOBS="https://openqa.your.instan.ce/tests/13311283 https://openqa.your.instan.ce/tests/13311263 https://openqa.your.instan.ce/tests/13311276 https://openqa.your.instan.ce/tests/13311278"BUILD="bsc1219073"for JOB in$JOBS;do
openqa-clone-job --within-instance$JOBCASEDIR=https://github.com/foursixnine/os-autoinst-distri-opensuse.git#tellmewhy ${REPEAT}\_GROUP=DEVELOPERS ${KERNEL}BUILD=${BUILD}FORCE_SERIAL_TERMINAL=1\TEST="${BUILD}_checkmdadm"YAML_SCHEDULE=schedule/qam/QR/15-SP5/textmode/textmode-skip-registration-extra.yaml INSTALLONLY=0 DESKTOP=textmode\
|& tee jobs-launched.list;done;
There are few things to note here:
the kernel repo must be the one without https; tests don’t have the CA installed by default.
the --repeat parameter is set to 100 by default, but can be changed to whatever number is desired.
the JOBS variable contains the list of jobs to clone and run, having all supported architecures is recommended (at least for this case)
the BUILD variable can be anything, but it’s recommended to use the bug number or something that makes sense.
the TEST variable is used to set the name of the test as it will show in the test overview page, you can use TEST+=foo if you want to append text instead of overriding it, the --repeat parameter, will append a number incrementally to your test, see os-autoinst/openQA#5331 for more details.
the YAML_SCHEDULE variable is used to set the yaml schedule to use, there are other ways to modify the schedule, but in this case I want to perform a full installation
Running the script
Ensure you can run at least the openQA client; if you need API keys, see post linked at the beginning of this post
replace the kernel repo with your branch in line 5
run the script $ bash trigger-kernel-openqa-mdadm.sh and you should get the following, times the --repeat if you modified it
1 job has been created:
 - sle-15-SP5-Full-QR-x86_64-Build134.5-skip_registration+workaround_modules@64bit -> https://openqa.your.instan.ce/tests/13345270
Each URL, will be a job triggered in openQA, depending on the load and amount of jobs, you might need to wait quite a bit (some users can help moving the priority of these jobs so it executes faster)
The review stuff:
Looking at the results
Go to https://openqa.your.instan.ce/tests/overview?distri=sle&build=bsc1219073&version=15-SP5 or from any job from the list above click on Job groups menu at the top, and select Build bsc1219073
Click on “Filter”
type the name of the test module to filter in the field Module name, e.g mdadm, and select the desired result of such test module e.g failed (you can also type, and select multiple result types)
Click Apply
The overall summary of the build overview page, will provide you with enough information to calculate the pass/fail rate.
A rule of thumb: anything above 5% is bad, but you need to also understand your sample size + the setup you’re using; YMMV.
Ain’t nobody got time to wait
The script will generate a file called: jobs-launched.list, in case you absolutely need to change the priority of the jobs, set it to 45, so it runs higher than default priority, which is 50
cat jobs-launched.list | grep https | sed -E 's/^.*->\s.*tests\///' | xargs -r -I {} bash -c "openqa-cli api --osd -X POST jobs/{}/prio prio=45; sleep 1"
The magic
The actual magic is in the schedule, so right after booting the system and setting it up, before running the mdadm test, I inserted the update_kernel module, which will add the kernel repo specified by KOTD_REPO, and install the kernel from there, reboot the system, and leave the system ready for the actual test,
however I had to add very small changes:
---
 tests/kernel/update_kernel.pm | 4 ++--
 1 file changed, 2 insertions(+), 2 deletions(-)

diff --git a/tests/kernel/update_kernel.pm b/tests/kernel/update_kernel.pm
index 1d6312bee0dc..048da593f68f 100644
--- a/tests/kernel/update_kernel.pm
+++ b/tests/kernel/update_kernel.pm
@@ -398,7 +398,7 @@ sub boot_to_console {
 sub run {
     my $self = shift;

-    if ((is_ipmi && get_var('LTP_BAREMETAL')) || is_transactional) {
+    if ((is_ipmi && get_var('LTP_BAREMETAL')) || is_transactional || get_var('FORCE_SERIAL_TERMINAL')) {
         # System is already booted after installation, just switch terminal
         select_serial_terminal;
     } else {
@@ -476,7 +476,7 @@ sub run {
         reboot_on_changes;
     } elsif (!get_var('KGRAFT')) {
         power_action('reboot', textmode => 1);
-        $self->wait_boot if get_var('LTP_BAREMETAL');
+        $self->wait_boot if (get_var('FORCE_SERIAL_TERMINAL') || get_var('LTP_BAREMETAL'));
     }
 }
Likely I’ll make a new pull request to have this in the test distribution, but for now this is good enough to help kernel developers
to do some self-service and trigger their own openQA tests, that have many more tests (hopefully in parallel) and faster than if there
was a person doing all of this manually.
Special thanks to the QE Kernel team, who do the amazing job of thinking of some scenarios like this, because they save a lot
of time.


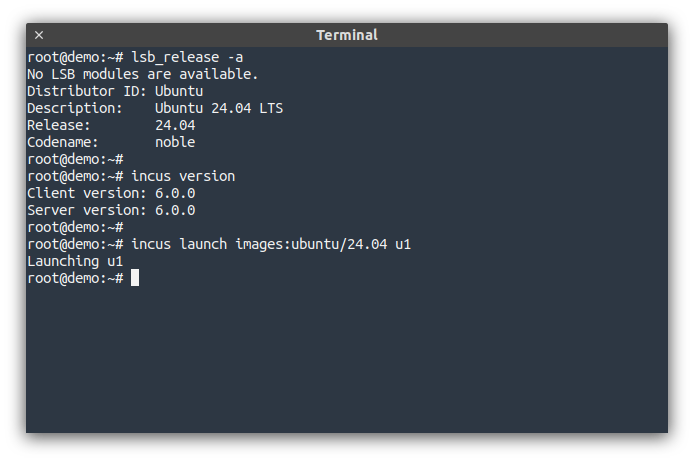
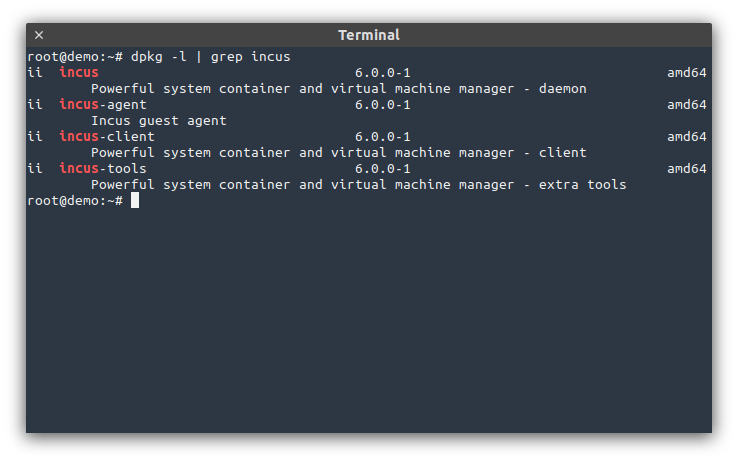
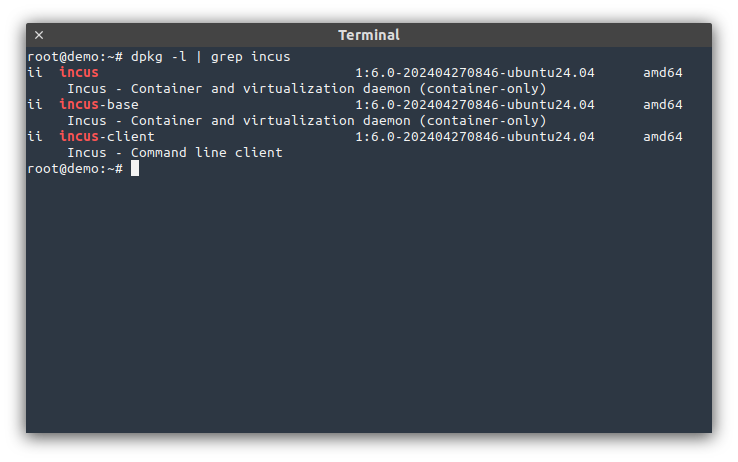

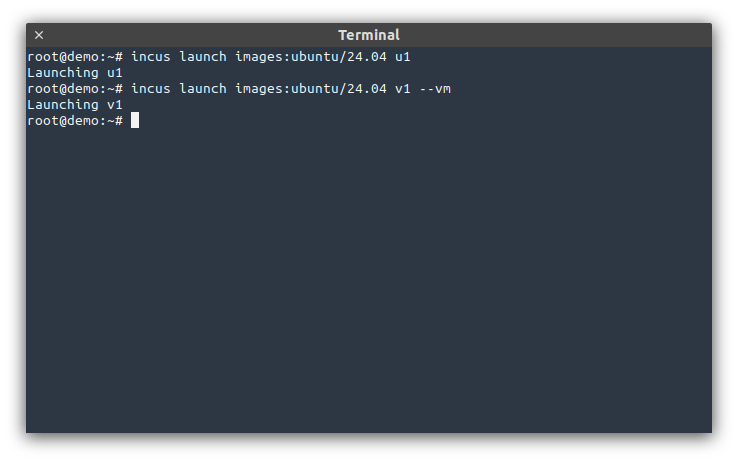
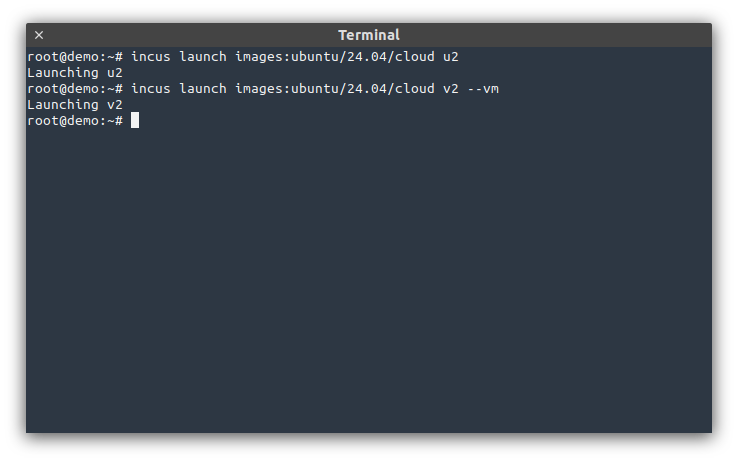
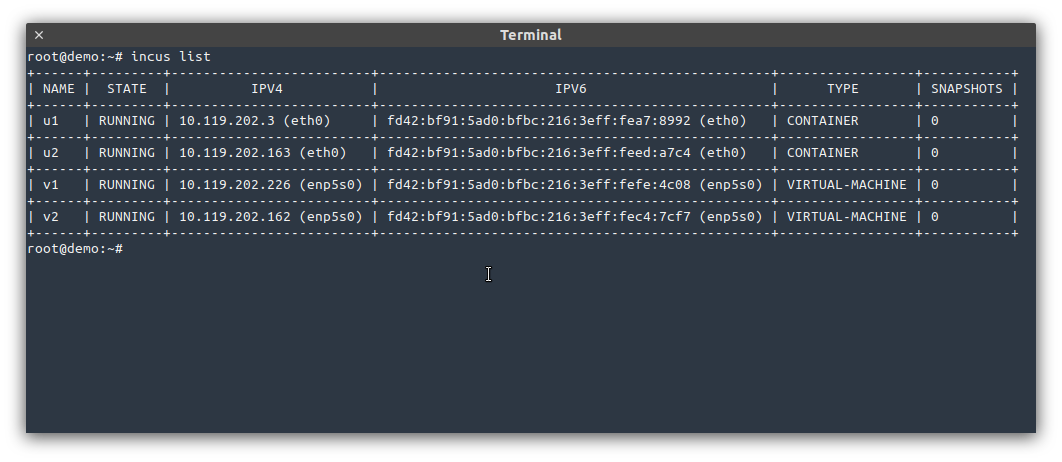


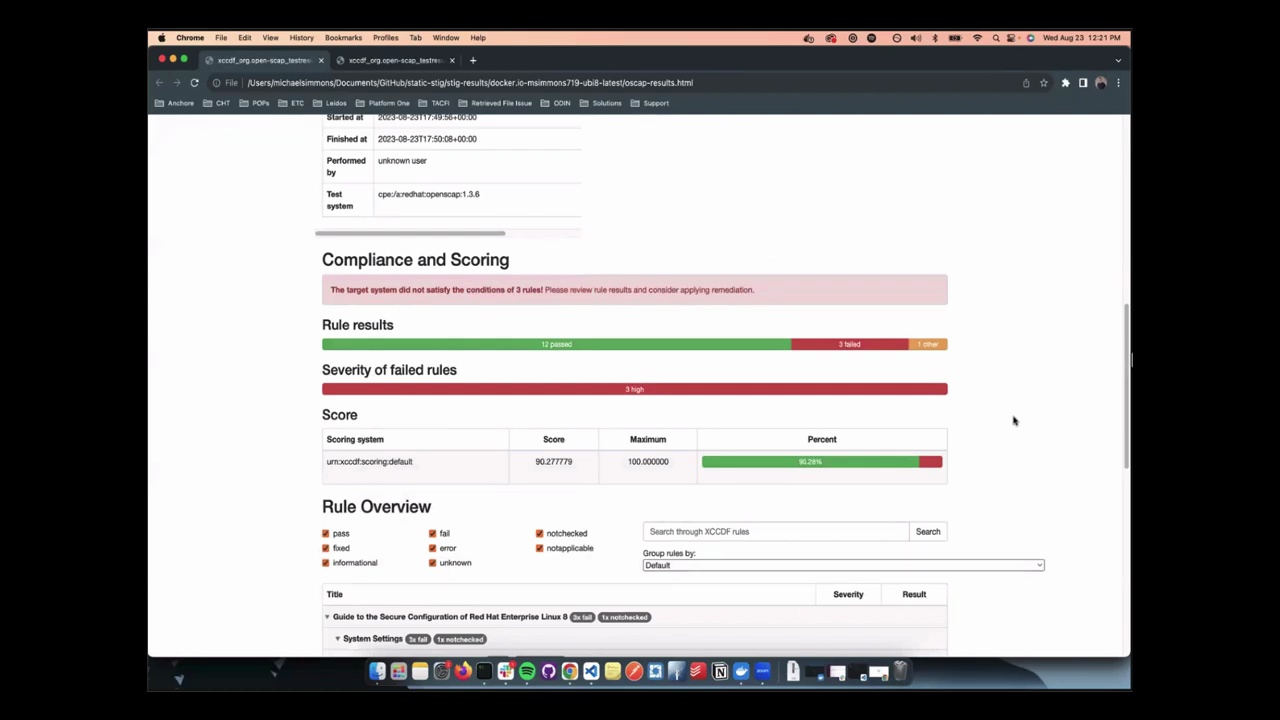
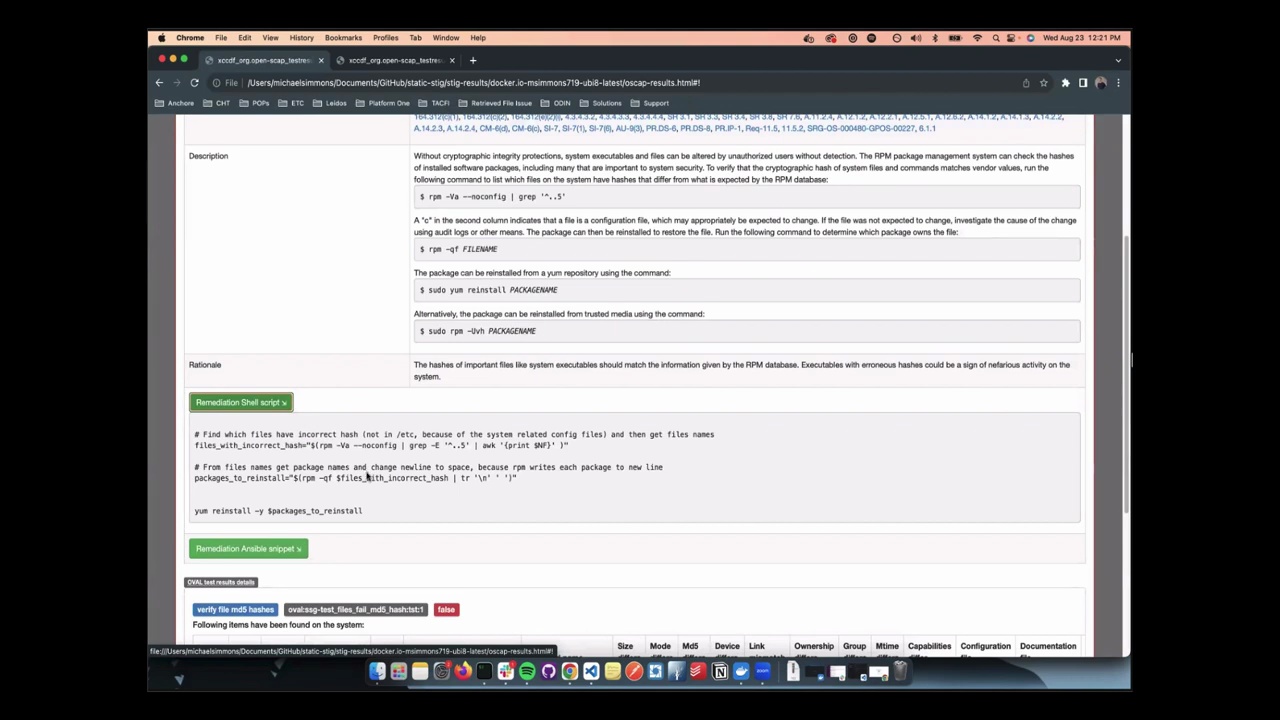
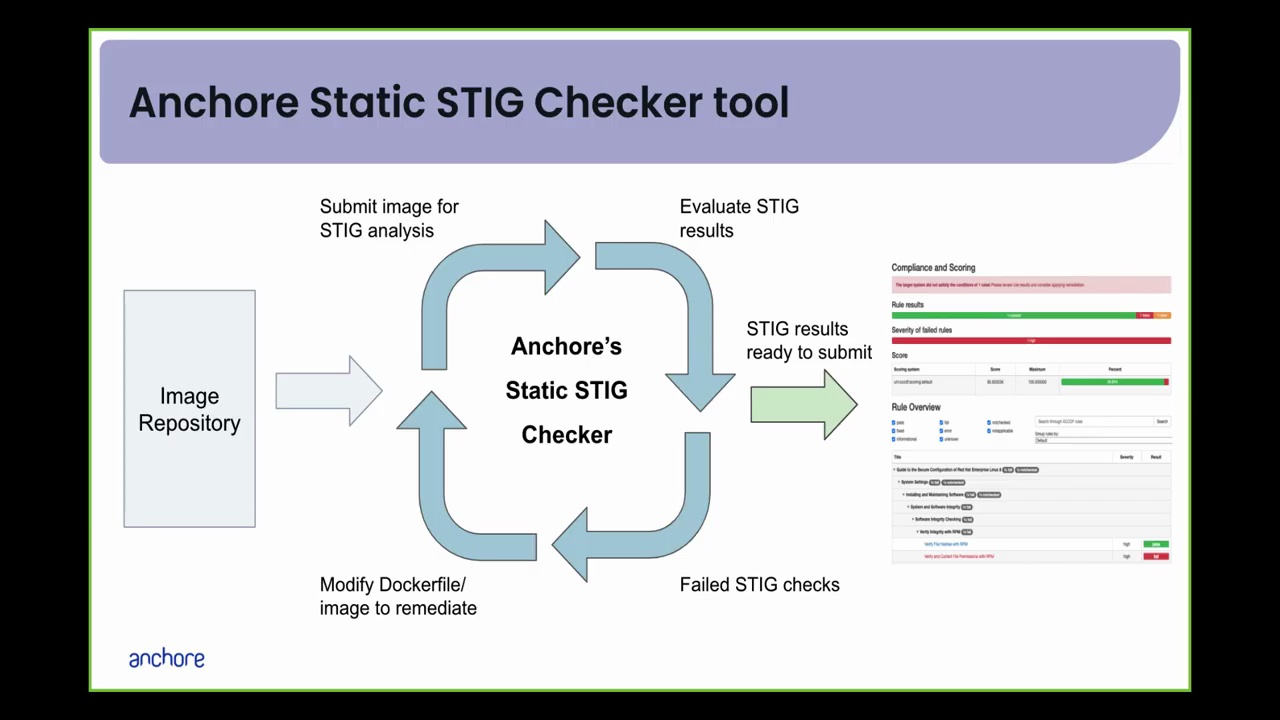


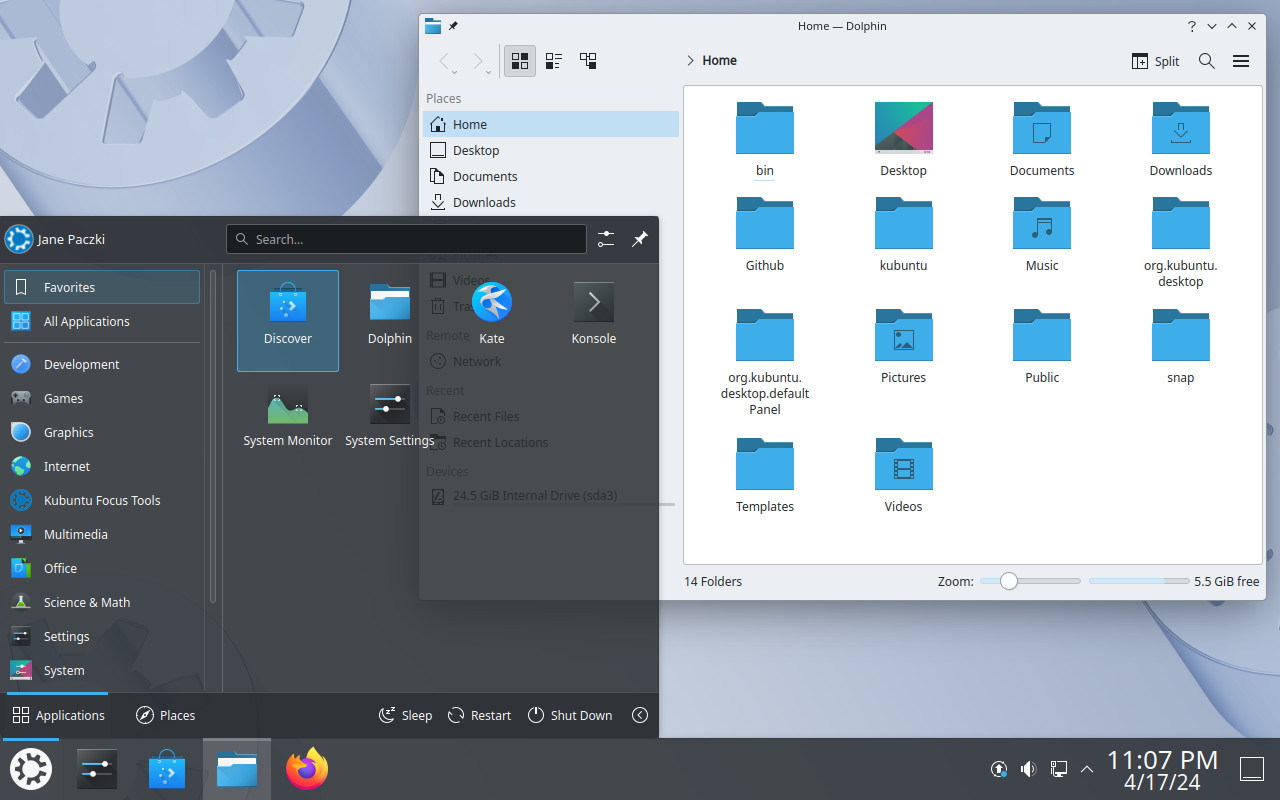 Kubuntu 24.04 with Plasma 5.27.11
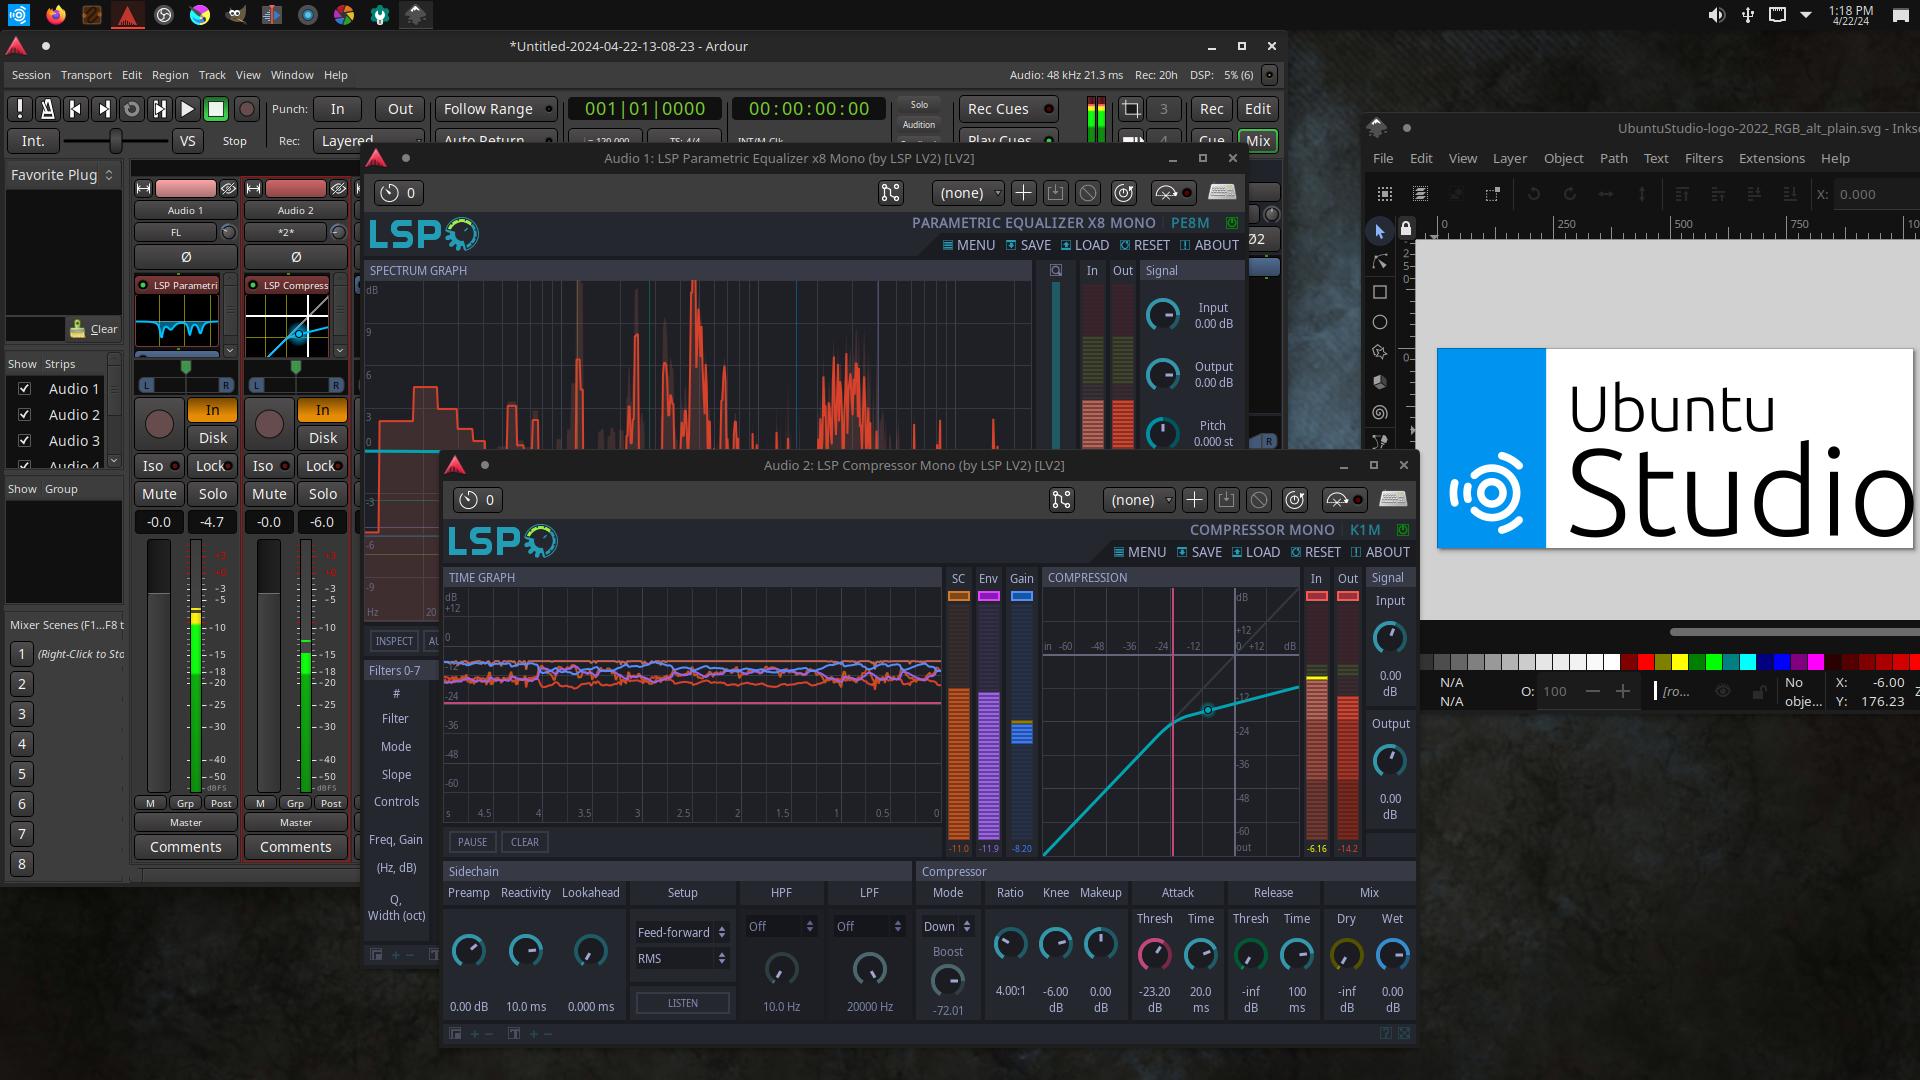
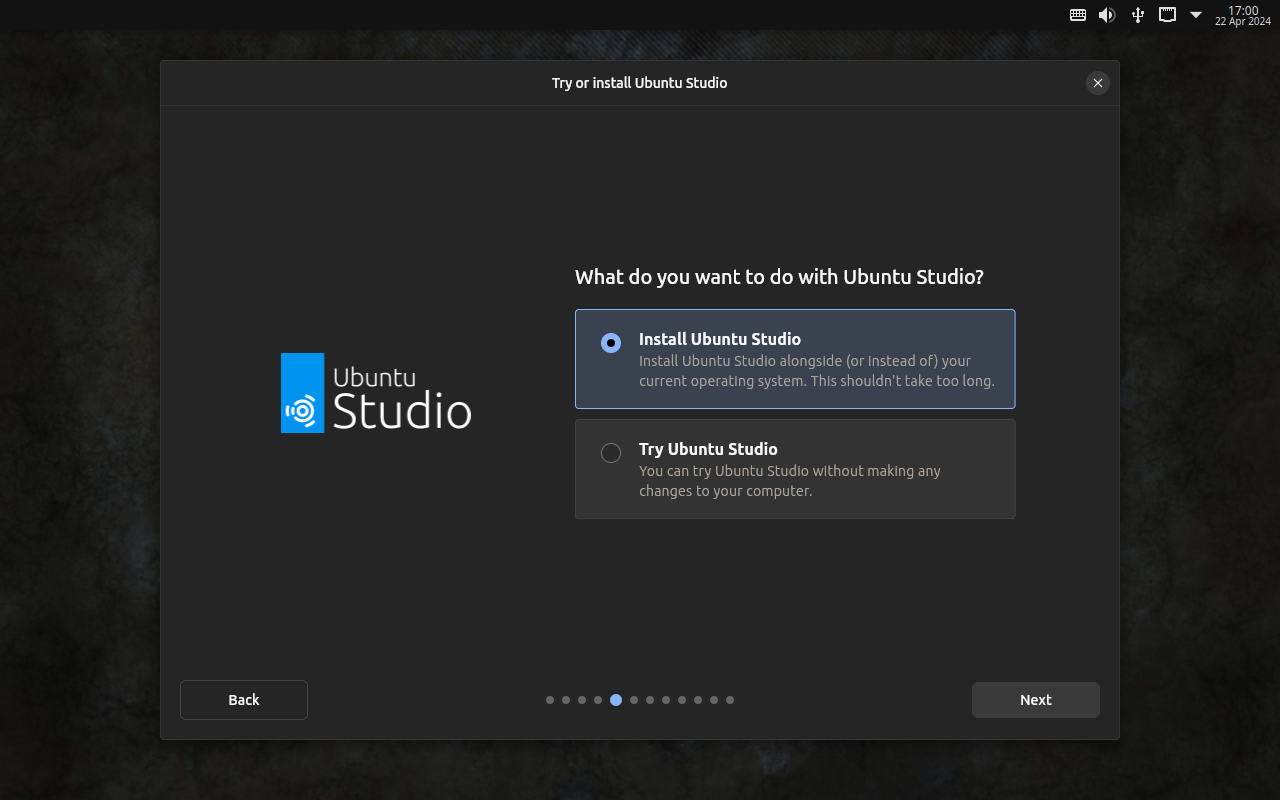

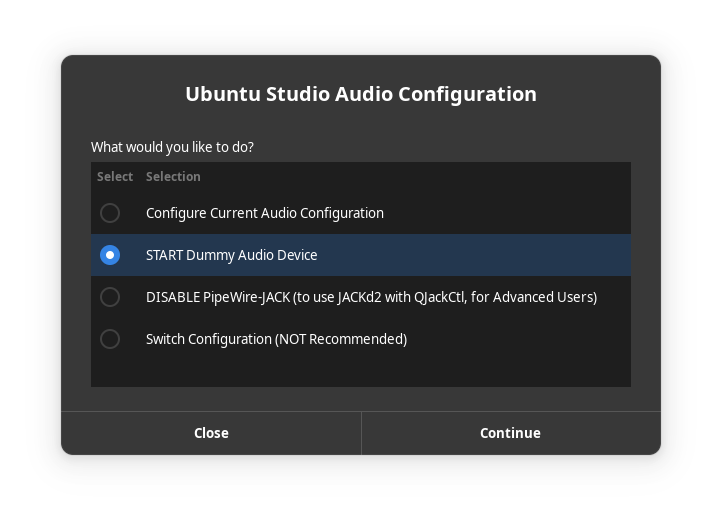


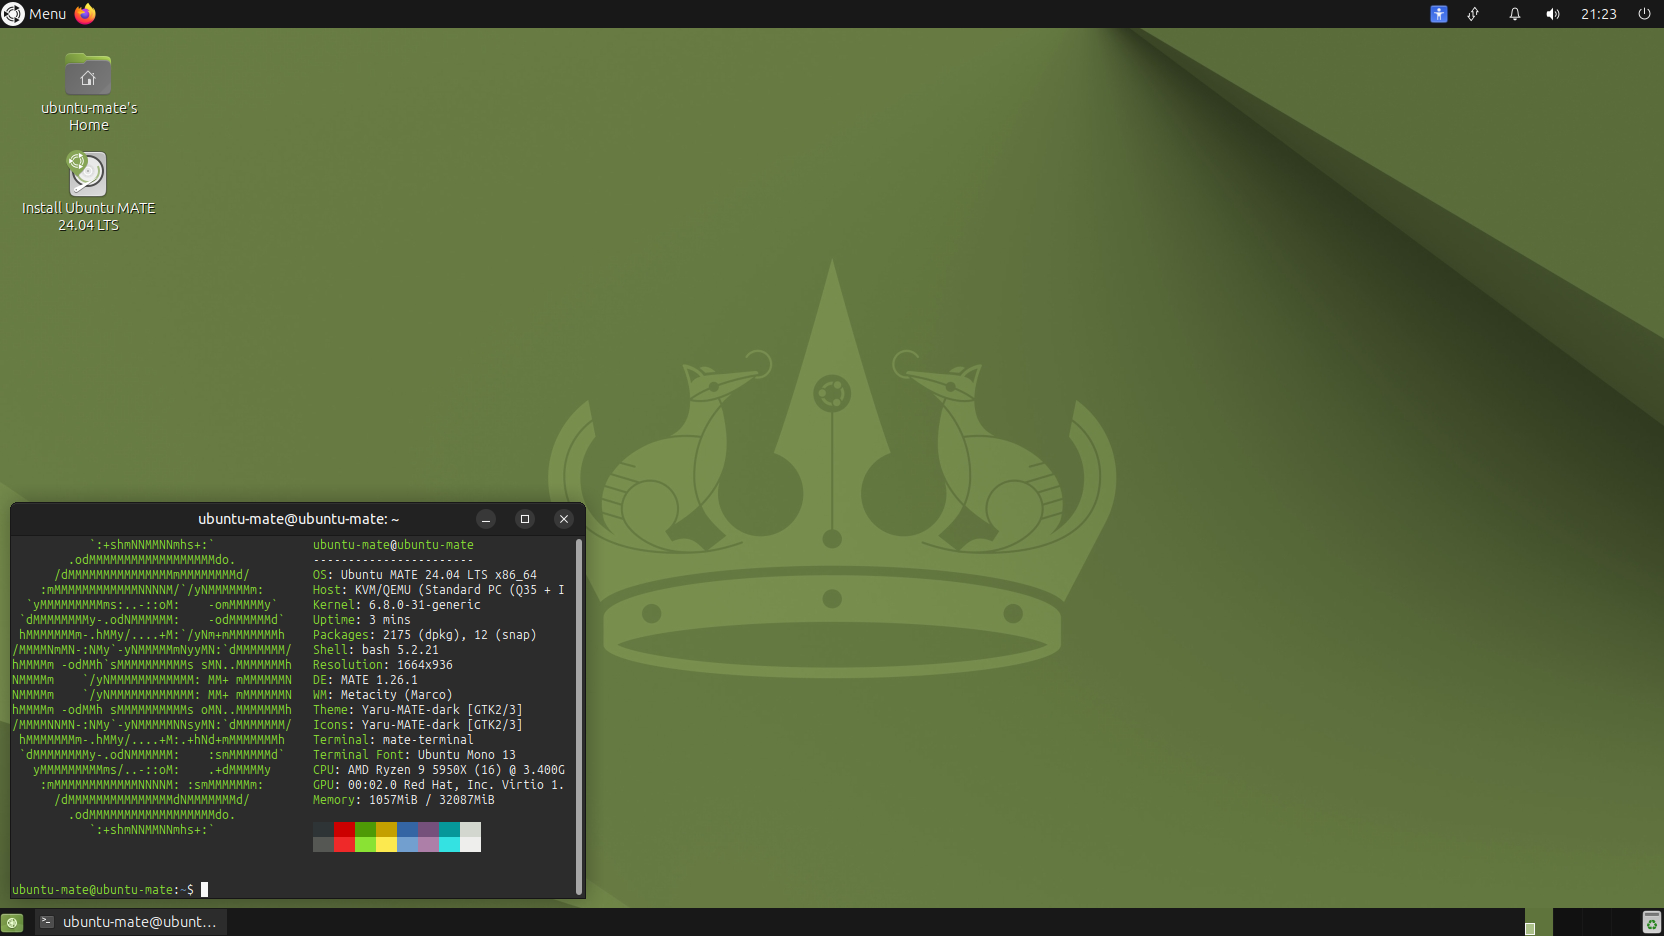 Ubuntu MATE 24.04 LTS


 Xubuntu 24.04, featuring the latest updates from Xfce 4.18 and GNOME 46.
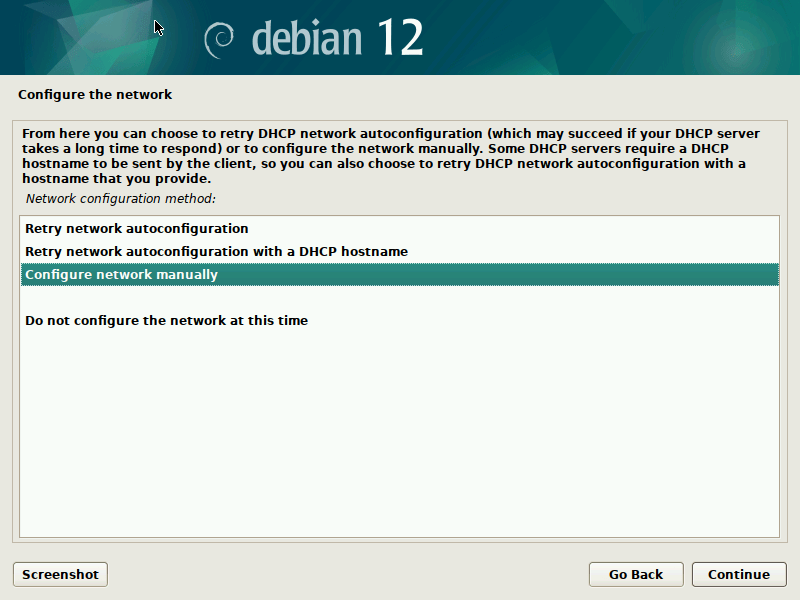
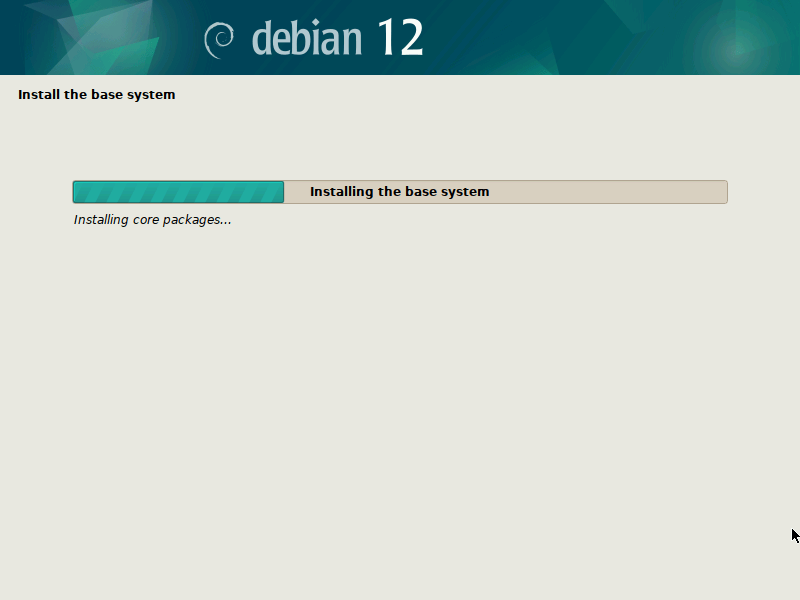
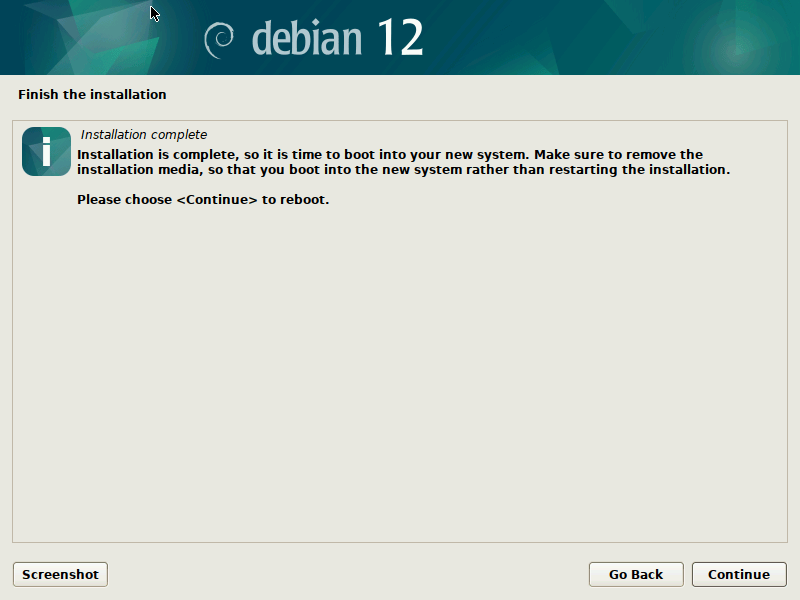
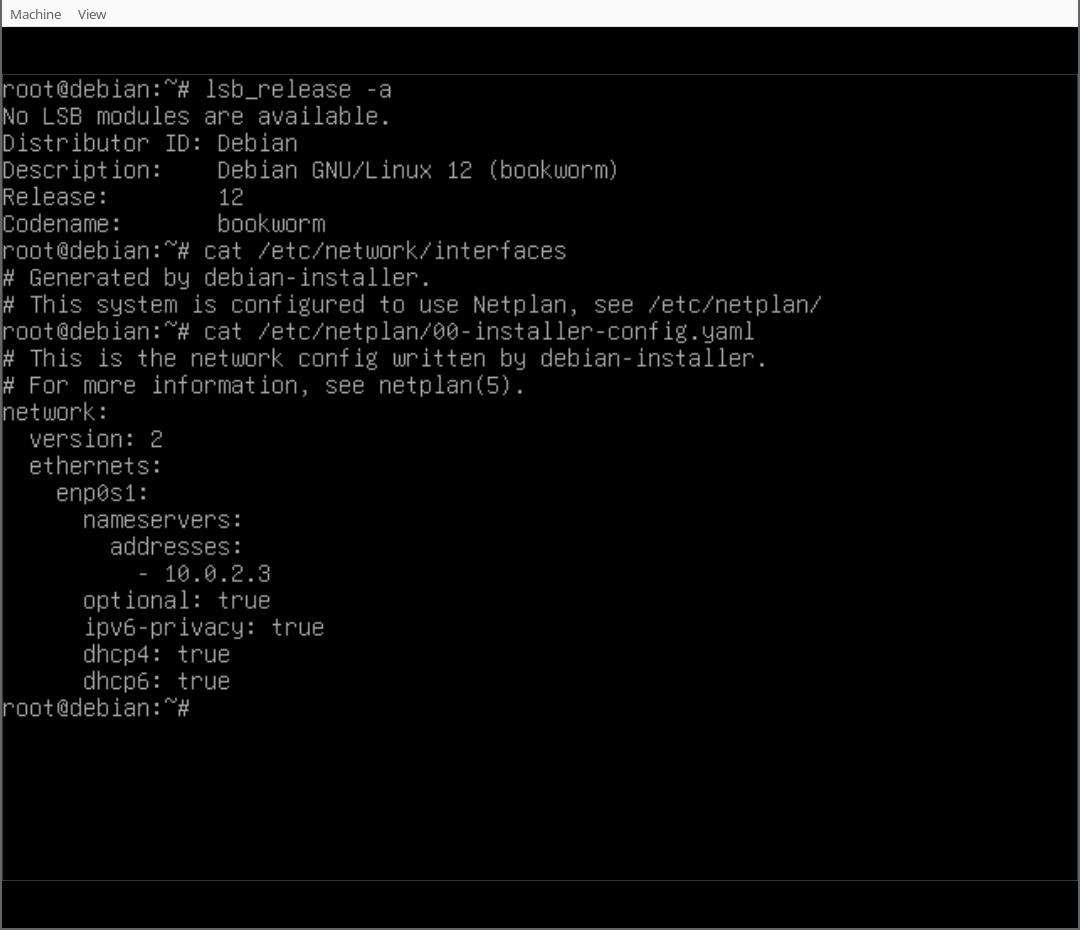
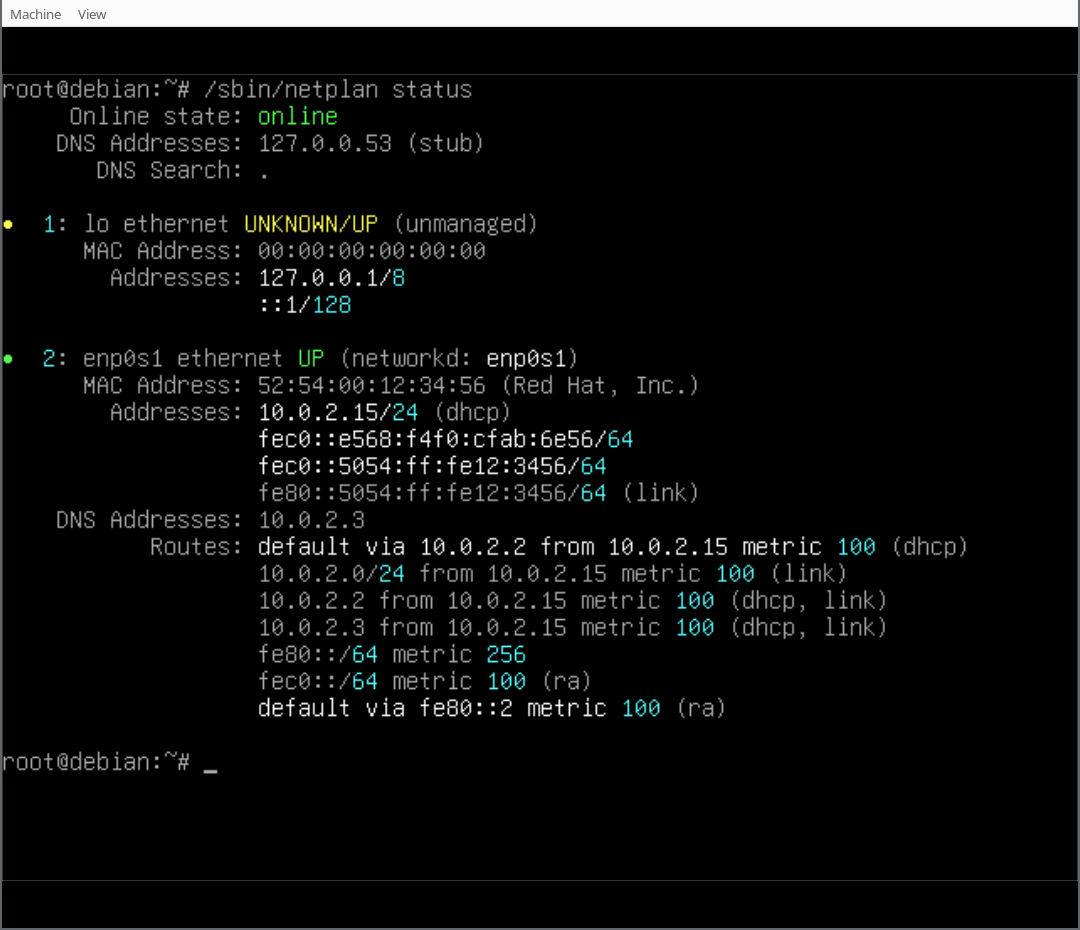

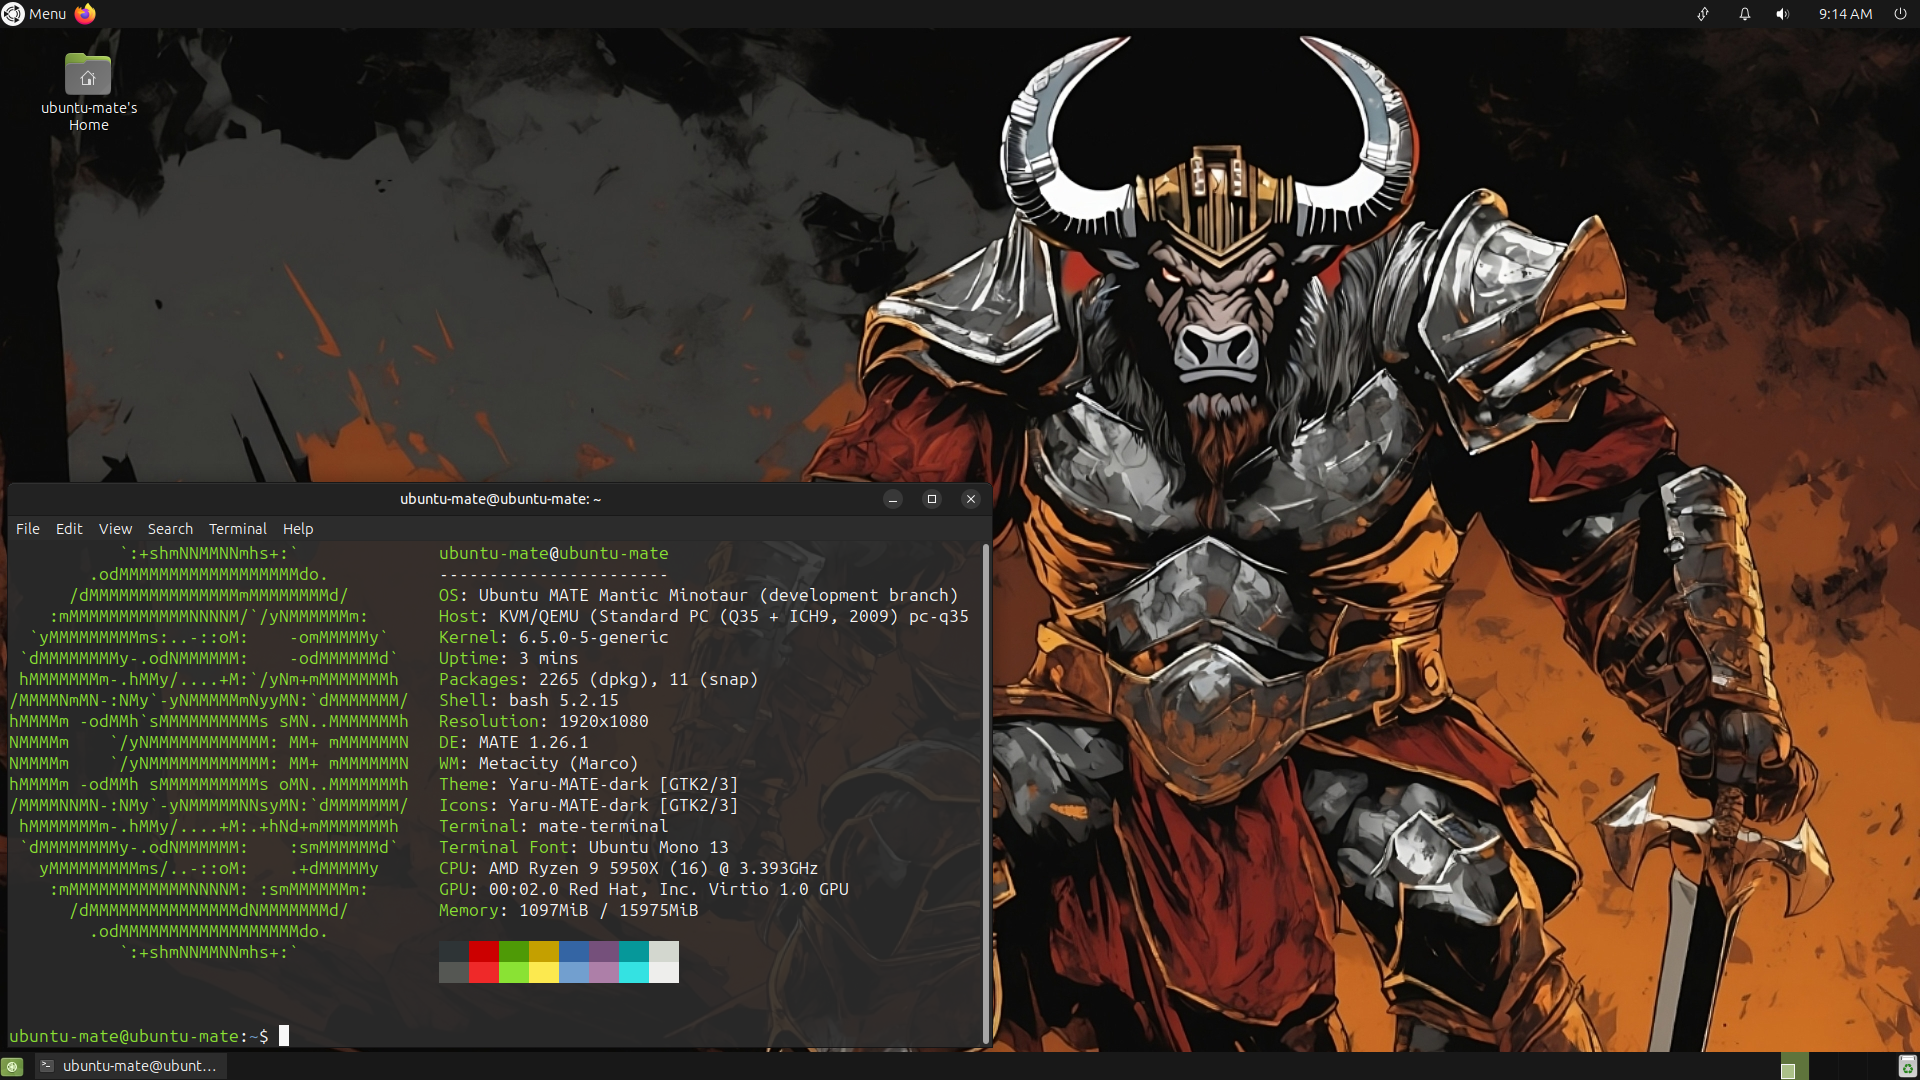 Ubuntu MATE 23.10


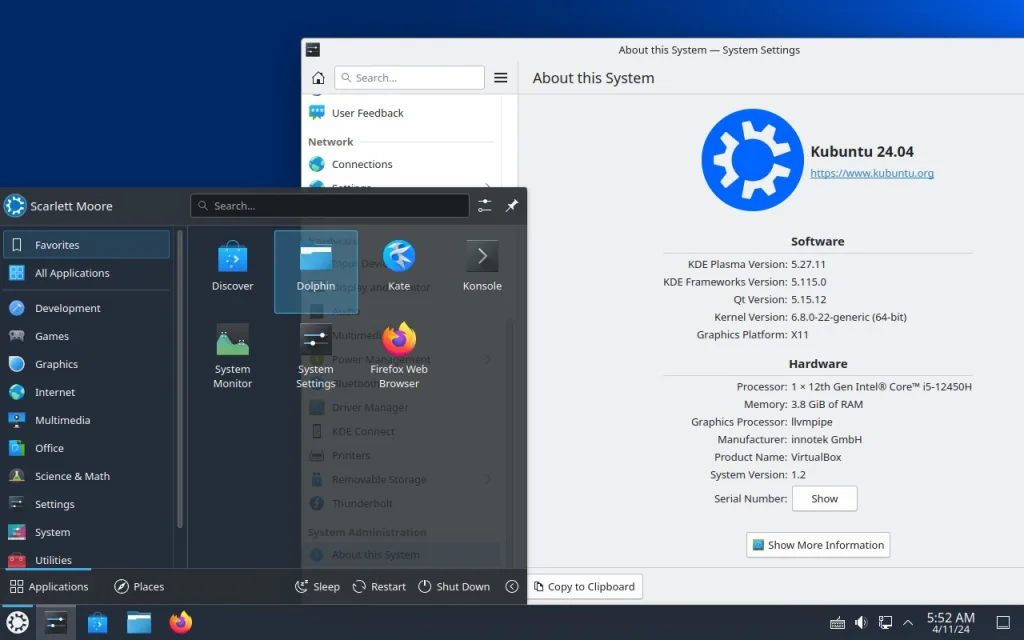
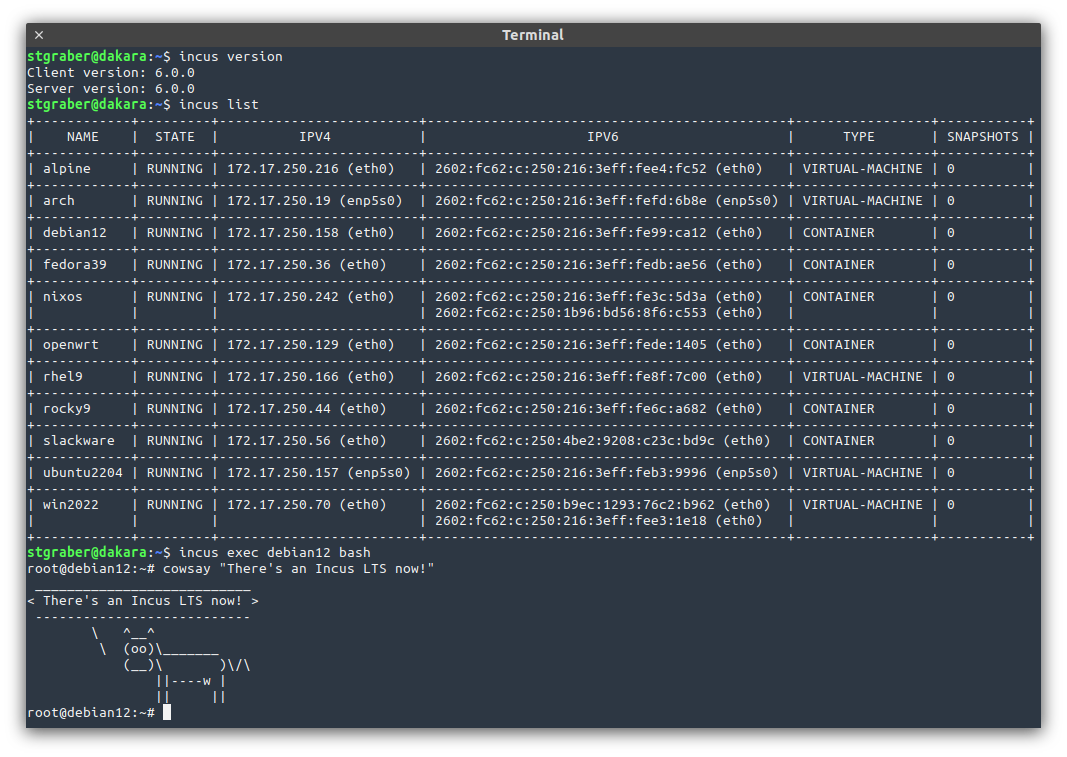
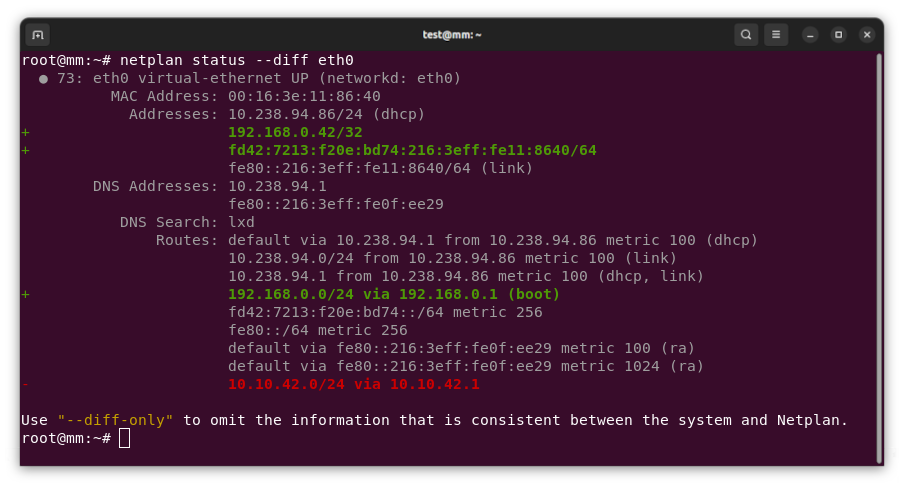


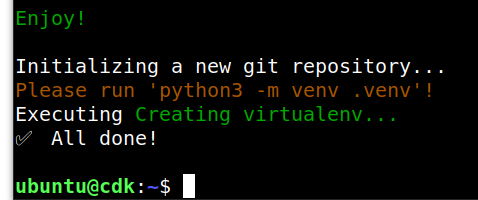


 Launchpad yesterday
 Launchpad today